

You probably didn’t plan for your shoulder to become the thing standing between you and training. But here you are, and you’re not alone.
Research confirms that 36% of injuries in the weightlifting population occur at the shoulder complex, and almost none of them happen from a single dramatic rep. They build quietly, rep by rep, session by session, until one day the shoulder decides it’s had enough.
The good news is that most shoulder injuries are completely preventable. At Anaconda, we work with lifters, CrossFitters, and strength athletes who refuse to choose between performance and shoulder health.
This guide gives you the full system warm-up, strengthening exercises, proper technique, smart programming, recovery, and when support gear belongs in the mix.
Key Takeaways
-
36% of weightlifting injuries involve the shoulder. Most are overuse, not acute.
-
Shoulder-specific warm-ups reduce acute impingement risk by up to 40%. Generic cardio warm-ups do nothing to protect joints.
-
Pressing-to-pulling ratios exceeding 1:1.5 increase impingement torque by 20 to 30 percent. Pull as much as you push.
-
Improper technique under heavy lifting is a leading cause of shoulder impingement and rotator cuff tears.
-
A shoulder brace during peak phases adds external stability while natural stabilizers build strength and reduce the risk of further injury.
-
Ongoing pain or limited movement should not be ignored. Early action saves months away from the bar.
Why Shoulder Protection Matters for Lifters
Think of the shoulder joint like the most overworked member of your training team.
It’s a ball-and-socket joint with an exceptional range of motion but limited bony stability, which makes it brilliant for overhead pressing, snatching, and throwing, but quietly fragile when fatigue and load keep piling on.
For powerlifters grinding through heavy bench cycles, CrossFit athletes cycling snatches under fatigue, and bodybuilders pushing overhead work session after session, the shoulder joint absorbs repetitive stress with no day off. That stress doesn’t reset between workouts. It accumulates.
And shoulder pain isn’t just an annoyance. It stalls PRs on the bench press, overhead press, clean and jerk, and snatch. 70% of shoulder pain in lifters comes from overuse, not acute trauma. That means the overwhelming majority of shoulder injuries are preventable with the right protocols in place, before symptoms ever even start.
Shoulder injuries often start with small issues that build up over time. Ongoing shoulder pain or limited movement should never be brushed off as normal soreness. It can indicate a more serious condition that requires professional evaluation before further injury occurs.
Common Shoulder Injuries From Weightlifting
Now that you know why the shoulder is so vulnerable under load, here’s exactly what goes wrong and why. Knowing the enemy is the first step to keeping it from showing up in your training.
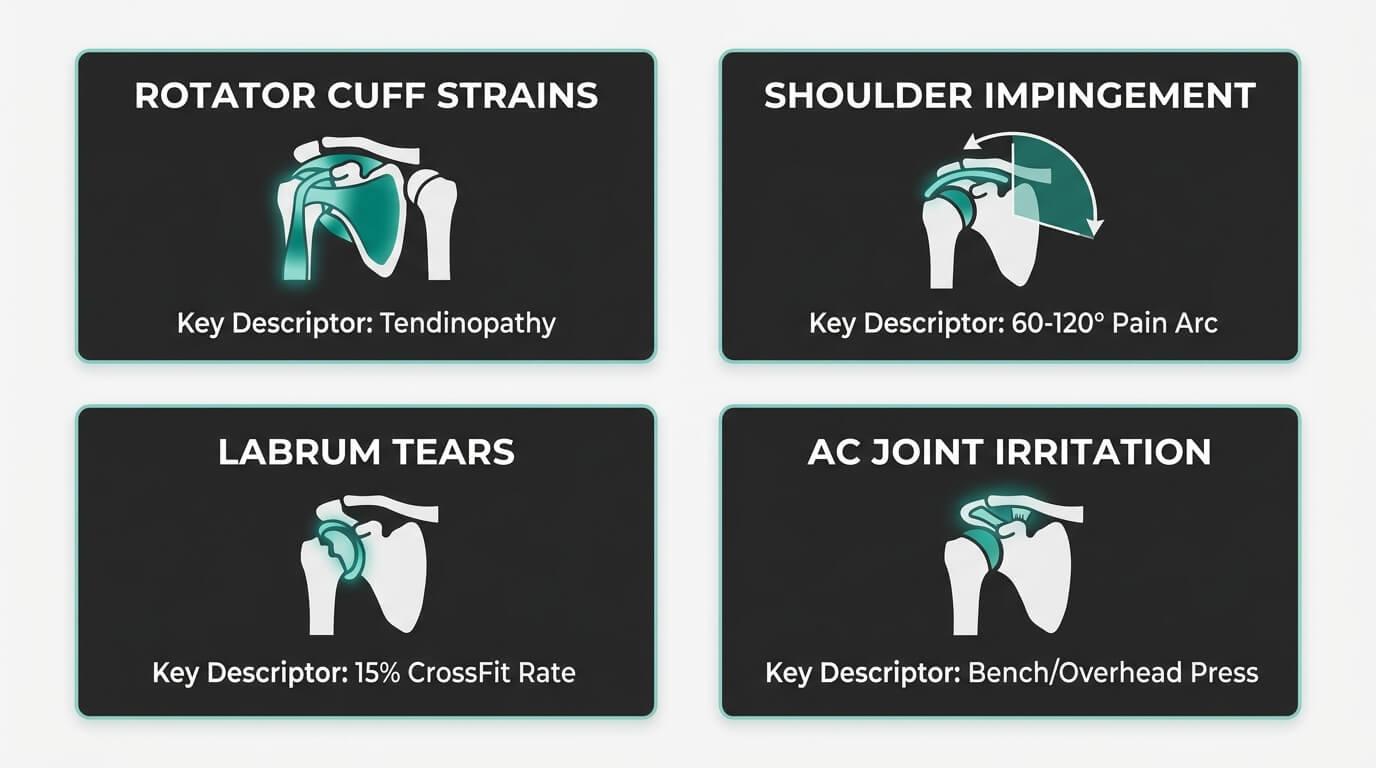
1. Rotator cuff strains and tendinopathy
The rotator cuff, made up of the supraspinatus, infraspinatus, teres minor, and subscapularis, stabilizes the upper arm in the shoulder socket. High-volume pressing, combined with poor eccentric control, allows microtraumas to build until they become a real problem.
A systematic review in the Journal of Orthopaedic and Sports Physical Therapy found rotator cuff partial thickness tears and tendinopathy in 34% of asymptomatic shoulders on ultrasound. Many lifters are already carrying silent damage long before shoulder pain appears.
2. Shoulder impingement
Weightlifter's shoulder, also known as subacromial impingement syndrome, is one of the most common injuries among those who engage in weightlifting and overhead sports. It occurs when rotator cuff tendons get compressed between the humeral head and acromion during overhead movements.
Symptoms include shoulder pain during overhead movements, shoulder weakness, and a limited range of motion that directly affects lifting performance. Peak compression happens between 60 and 120 degrees of shoulder abduction, exactly the range you pass through on every overhead press rep.
3. Labrum tears
SLAP (Superior Labrum Anterior to Posterior) tears and labrum damage develop from heavy benching, deep dips, and poor form pull-ups that stress the shoulder blade and internal rotation mechanics. CrossFit populations show labrum injury rates around 15%, driven largely by high-volume kipping under fatigue.
4. AC joint irritation
Also called the weightlifter's shoulder in clinical settings, AC joint compression builds through repeated bench press, incline press, and front rack positions. It rarely announces itself dramatically. It just gradually limits how much load you can comfortably handle.
Early warning signs include a sharp pinch at the top of a press, pain loading plates at shoulder height, night pain in the affected shoulder, and instability when lowering weight overhead. Ignoring these for 2 to 4 weeks often turns a manageable ache into months of rehabilitation or rotator cuff surgery.
Always Prioritize a Proper Warm-Up
Here’s the cheapest, fastest shoulder injury prevention tool available to you right now: a proper warm-up. Not five minutes on the treadmill, not a couple of arm swings while you load the bar. An actual targeted shoulder warm-up that prepares the joint for what you are about to put it through.
Warming up before heavy lifting raises core temperature, lubricates the shoulder joint, increases muscle flexibility, and fires up the stabilizers before any load goes on the bar.
Research shows proper shoulder-specific warm-ups reduce acute impingement risk by up to 40%. Using dynamic stretches before lifting beats static stretching, which can actually reduce power output by 5 to 10% when done pre-load.
Save stretching exercises for after your session.
Pre-Overhead Press Warm-Up Sequence
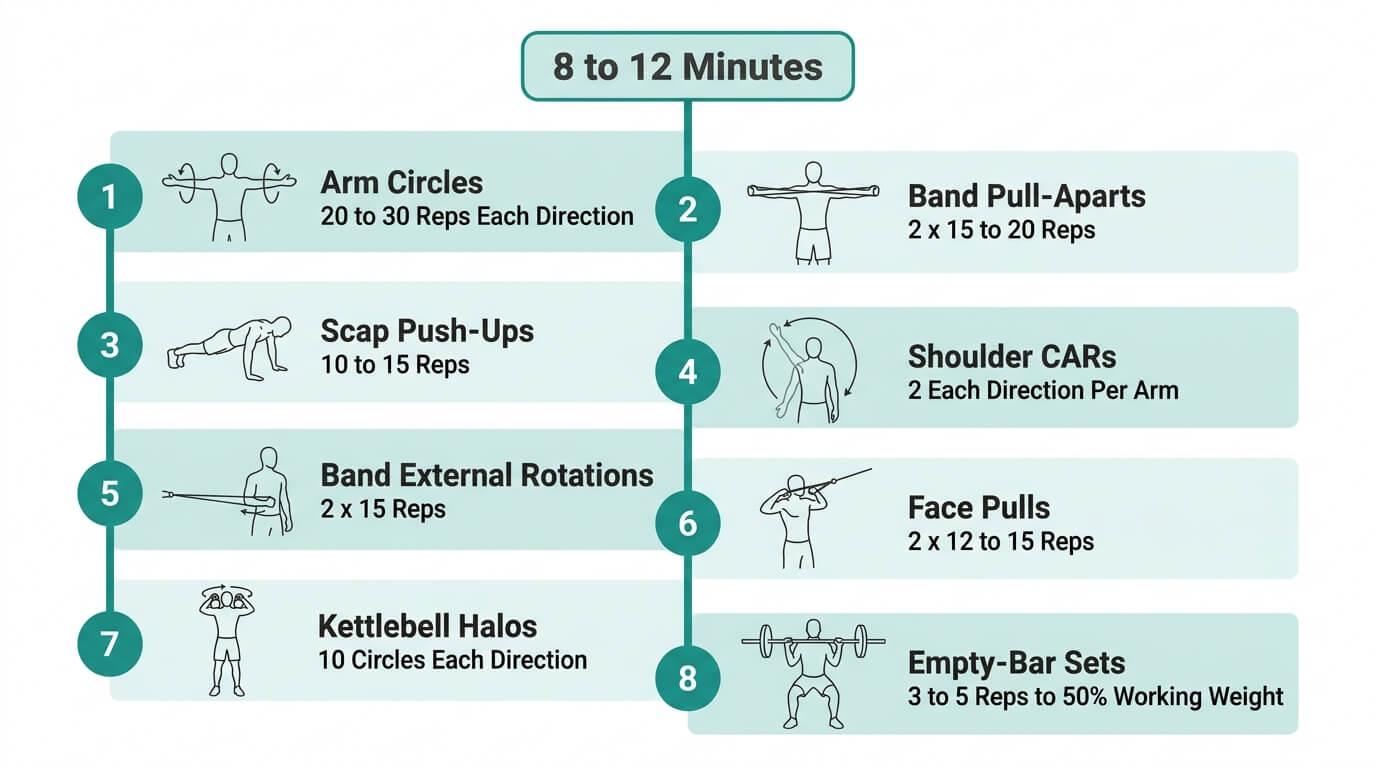
Allocate 8 to 12 minutes before any pressing or overhead work. Each of these movements has a specific job: raise temperature, increase blood flow, or activate a stabilizer that will protect your shoulder joint under load.
Run through them in order:
-
Arm circles: 20 to 30 reps each direction
-
Band pull-aparts: 2 sets of 15 to 20 reps, focus on scapular retraction
-
Scap push-ups: 10 to 15 reps to activate serratus anterior
-
Shoulder CARs (controlled articular rotations): 2 each direction per arm
-
Band external rotations: 2 sets of 15 reps, elbow pinned to side
-
Face pulls with resistance band: 2 sets of 12 to 15 reps
-
Light kettlebell halos: 10 circles each direction
-
Empty-bar technique sets: 3 to 5 reps ramping to 50% working weight
Strengthen and Balance the Shoulder Musculature
A warm-up protects you today. Strength training protects you for years. Strong, balanced shoulder muscles and scapular stabilizers are your best long-term insurance for heavy lifting, and weakness in these areas is exactly why most overuse shoulder injuries happen in the first place.
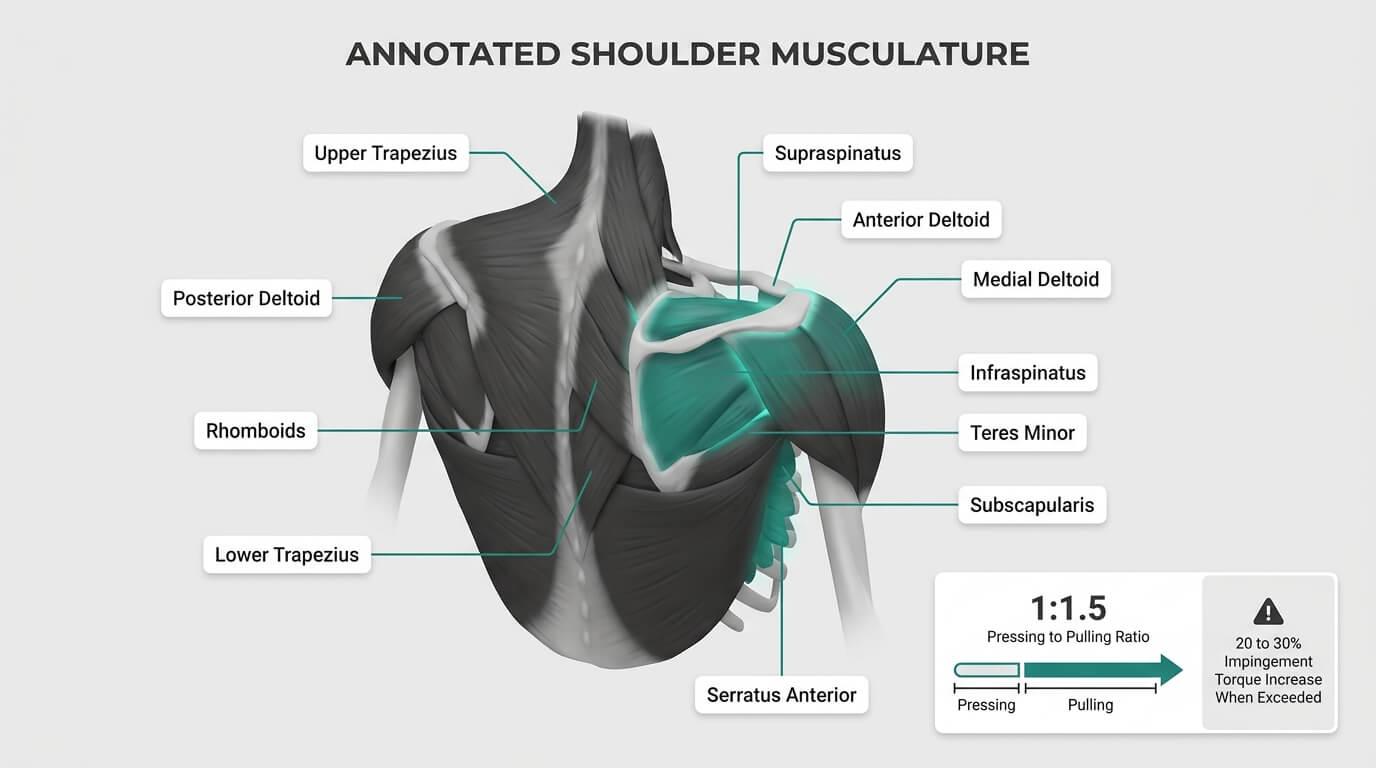
Key Muscle Groups to Target
Focus on three areas of the rotator cuff (supraspinatus, infraspinatus, teres minor, subscapularis), all three deltoid heads (anterior, medial, posterior), and the scapular stabilizers, including the upper and lower trapezius, serratus anterior, and rhomboids.
These muscle groups directly determine how well your shoulder joint handles repetitive stress from heavy lifting.
Add These Strengthening Exercises 2 to 3 Times Per Week
These are not glamorous exercises. Nobody posts their face pulls on social media. But these are the movements that keep the rotator cuff healthy, the scapula tracking properly, and the shoulder joint protected through every heavy session that matters:

Critical balance principle
Match horizontal pulling volume to pressing volume.
To avoid shoulder injuries, balance pushing and pulling exercises in every session. Research shows that pressing-to-pulling ratios exceeding 1:1.5 shift the humeral head forward, increasing impingement torque by 20-30%. For every bench press session, include rows or pull-ups.
Consider using a shoulder brace during higher-risk phases, such as heavy peaking cycles or returning after rest days, to add external stability while stabilizers build strength.
The Anaconda shoulder brace delivers targeted compression that enhances proprioceptive feedback and improves stabilizer firing without restricting the range of motion you need for heavy lifting.
Perfect Your Lifting Form for Shoulder-Safe Training
Strength work builds the foundation. Technique determines whether that foundation actually holds under load.
No brace, prehab routine, or mobility drill will protect your shoulders if bar path and joint positions are consistently off. Improper technique under heavy lifting is a leading cause of shoulder impingement and rotator cuff tears, full stop.
The rule every serious lifter needs to hear: Prioritize perfect technique over too much weight. Slow and controlled beats fast and sloppy every time. Controlling movements with slow, steady lifting rather than momentum-driven reps keeps your shoulder joint stable when the weight gets real.
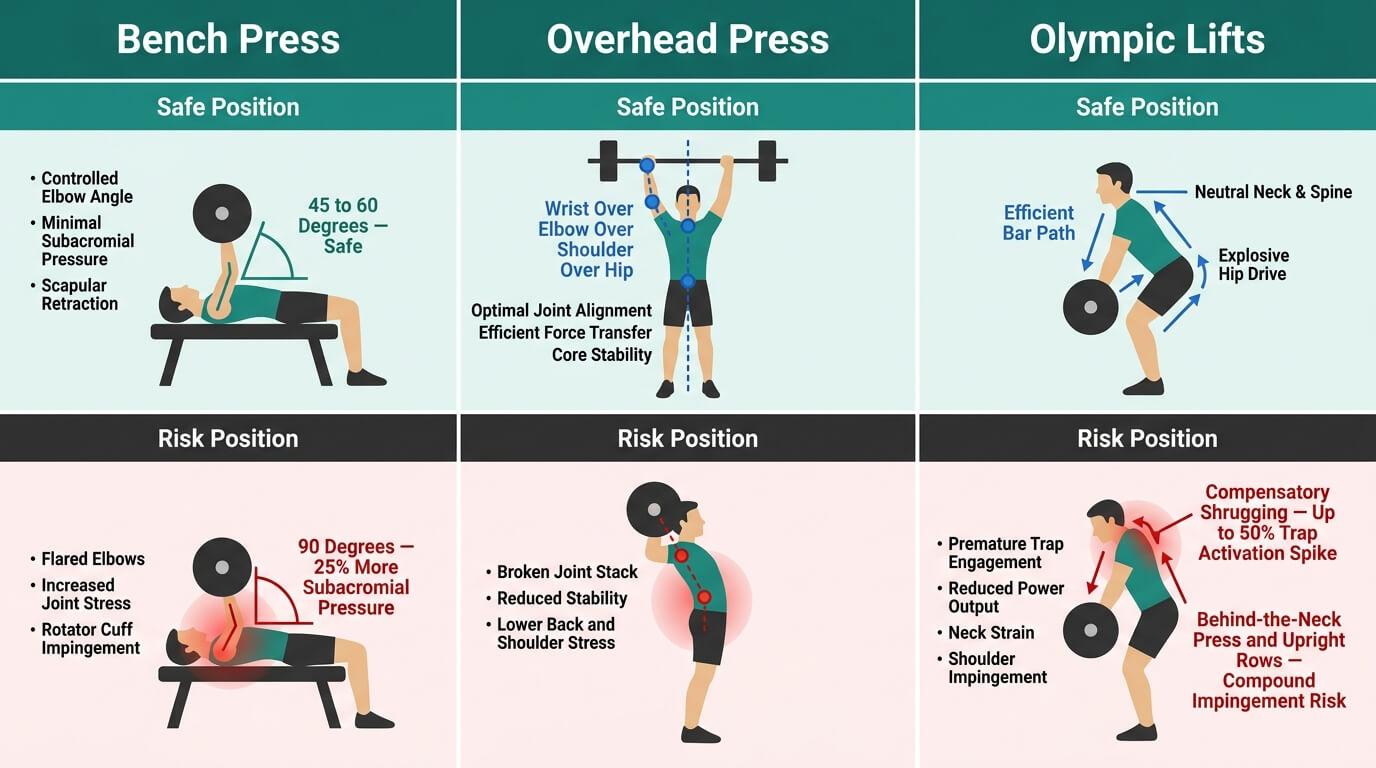
Bench Press Checkpoints
-
Retract and depress shoulder blades, keeping them down and back to create a stable base
-
Elbows at 45 to 60 degrees from the torso, not 90 degrees, which increases subacromial pressure by 25%
-
Stack wrists over elbows throughout the full movement
-
Controlled bar path from mid-chest to lockout, no bouncing off the chest
-
Avoid locking elbows at the top; keep a slight bend to maintain muscle stress instead of joint stress
Overhead Press Checkpoints
-
Stack joints: wrist over elbow over shoulder over hip
-
Brace glutes and core for intra-abdominal pressure before each rep
-
Keep the bar path close to the face; the head moves through the window at lockout
-
Avoid excessive leaning forward at the bottom of the movement
-
Keep shoulder blades retracted and depressed throughout the lift
Olympic Lifts (Snatch, Clean and Jerk)
-
Adequate thoracic extension is required to achieve a stable overhead lockout
-
Sufficient shoulder flexibility to hold weight overhead without lumbar hyperextension
-
Poor mobility forces compensatory shrugging, spiking trap activation by up to 50%
-
Certain movements pose high risk for athletes with limited mobility: behind-the-neck presses and upright rows create unnatural shoulder positions that compound impingement risk
Use Smart Programming, Load Management, and Support Gear
You can warm up perfectly, strengthen all the right muscles, and lift with textbook technique, and still wreck your shoulder if the programming is reckless. Even good technique can’t save your shoulder from chronic overload or the kind of weight jumps your ego writes checks your tendons cannot cash.
Smart programming prevents further injury before it ever starts. And engaging your core while lifting helps distribute the load evenly, reducing the strain landing directly on the shoulder joint. Keep the load close to the body and maintain a straight back, especially during heavy lifting, to keep your shoulder out of the danger zone.
Programming Principles
-
Limit weekly volume or intensity increases to 5 to 10% for pressing and overhead work
-
Rotate pressing variations across 4-week blocks: flat bench to incline to dumbbells to close-grip
-
Cycle high-risk movements like behind-the-neck press or deep ring dips, and replace them if they cause repeated irritation
-
Use a neutral grip with dumbbells where possible to reduce shoulder impingement under load
-
Avoid loading too much weight before your tendons and tissues have adapted
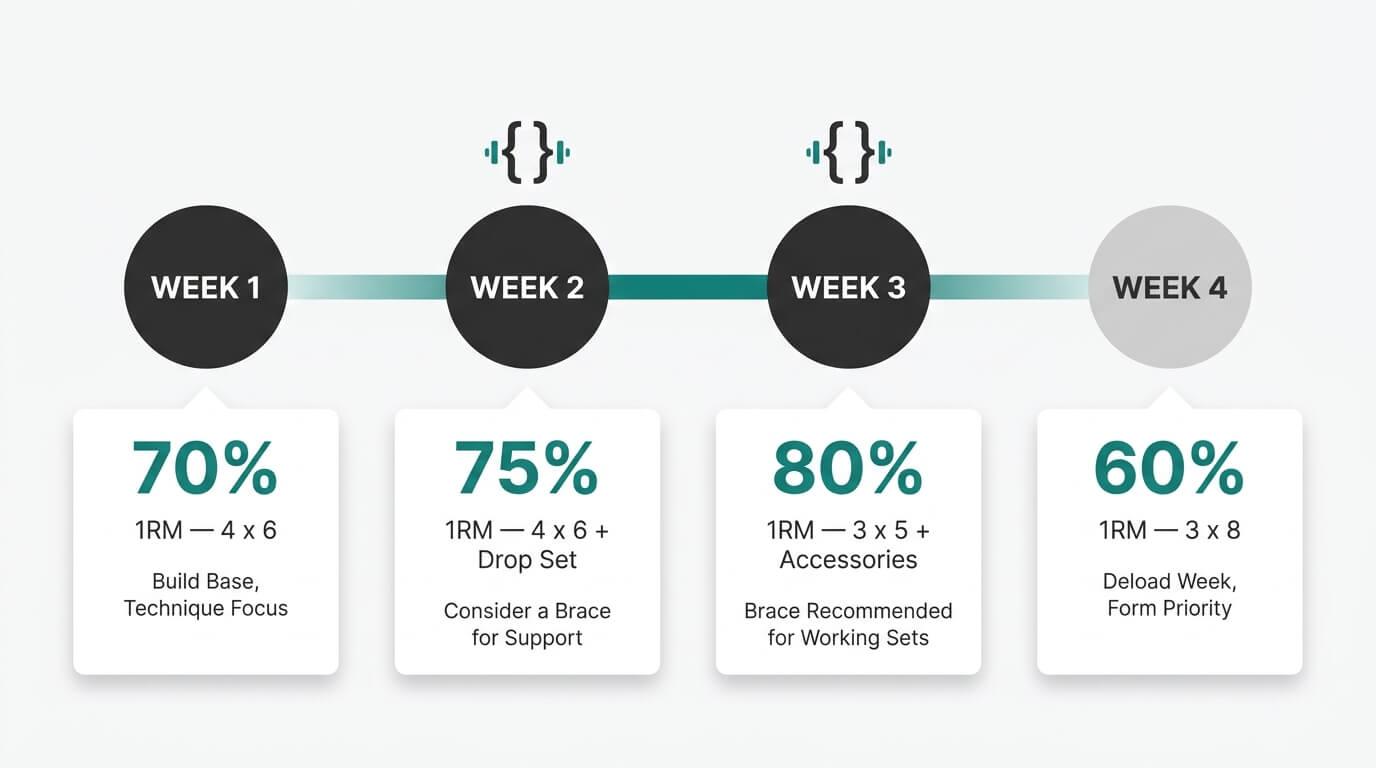
Sample 4-Week Pressing Progression
Here’s how a structured pressing block looks with shoulder protection built in from week one:

Recovery Habits That Keep Your Shoulders Lifting Long-Term
You did the warm-up. You lifted with good form. You followed the program.
Now comes the part most lifters skip and then wonder why their shoulder keeps flaring up: recovery. Progress happens between sessions, and the shoulder joint does not care how hard you trained if you are not giving it what it needs to rebuild.
Recovery isn’t optional, nor is it soft. It’s a core pillar of shoulder injury prevention, and the athletes who skip it are the ones who end up in the physio room trying to figure out what went wrong.
-
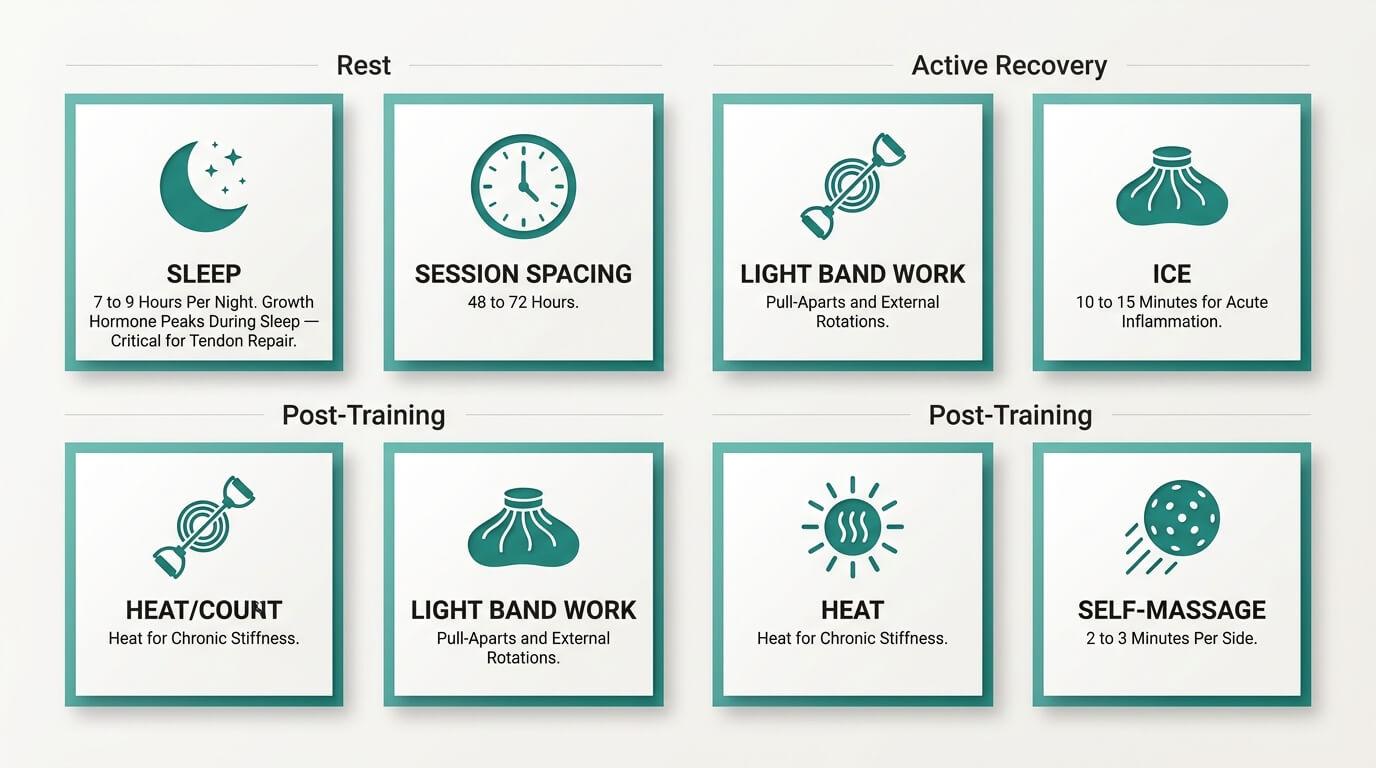
Sleep: Aim for 7 to 9 hours per night. Growth hormone peaks during sleep, which is critical for tendon and muscle repair in the rotator cuff. Chronic sleep deficit compromises tissue healing and increases soreness across every muscle group.
-
Session spacing: When the shoulder feels irritated, space heavy upper-body sessions by 48 to 72 hours. Use a lighter technique or accessory days with rest days in between to maintain movement and range of motion without the loading that compounds the problem.
Active Recovery Methods
-
Light band work: pull-aparts and external rotations at low intensity
-
Easy rowing or swimming to maintain blood flow without shoulder stress
-
Gentle mobility sessions focusing on thoracic spine motion and shoulder range of motion
Post-Training Strategies
-
Ice for acute inflammation: 10 to 15 minutes on the affected shoulder
-
Heat for chronic stiffness between sessions
-
Self-massage with a lacrosse ball on pecs, infraspinatus, and upper traps: 2 to 3 minutes per side
-
Regular stretching of biceps, triceps, and posterior shoulder post-session
A shoulder brace worn post-session or during daily activities when shoulders are sore maintains warmth, helps reduce swelling, and reminds the body to avoid awkward positions that stress the injured shoulder. For athletes also managing muscle strain recovery alongside training, the same recovery principles apply directly.
When Shoulder Pain Means You Should Stop and Get Help

Everything in this guide is built to keep you training, but the smartest thing a lifter can know is when not to train through it.
Using a brace or doing mobility drills to push through significant shoulder pain isn’t toughness. It’s muting a signal your shoulder is sending you, and that signal usually has something serious to say.
Stop immediately if you feel sharp or sudden pain during shoulder movements. Do not finish the set. Do not try one more rep.
Early action almost always saves months of recovery that delayed action would have made inevitable.
Red-Flag Symptoms Requiring Immediate Attention
-
Sudden sharp pain during a lift
-
Immediate weakness in the arm compared to normal
-
Feeling or hearing a pop in the shoulder
-
Visible deformity at the shoulder
-
Inability to raise the arm to shoulder height or above
Subtle Signs That Still Need Professional Assessment
-
Persistent pain lasting more than 7 to 10 days despite rest
-
Night pain disrupting sleep on the affected shoulder
-
Limited movement or loss of range of motion compared to your other side
-
Pain-free motion becomes painful again after a brief improvement
If you experience any of these, stop the aggravating movement immediately. Consulting a sports medicine physician, orthopedic specialist, or physical therapist who understands weight-training mechanics ensures a proper diagnosis and a realistic return-to-lifting plan.
Neither mobility drills nor a shoulder brace should mask serious pain. They support rehabilitation and safe training. They don’t override warning signs of significant injury, such as rotator cuff tears.
Final Thoughts
Protecting your shoulders during weightlifting isn’t about lifting less; it’s about lifting smarter. The athletes who stay injury-free the longest are the ones who warm up properly with dynamic stretches, build the right strength balance, and respect what their shoulder is telling them before a small signal becomes a common injury that sidelines them for months.
Rotator cuff injuries, impingement, and labrum issues don’t appear overnight. They’re the result of small compromises repeated over hundreds of sessions. Fixing your form, loading sensibly, and staying consistent with prehab are what keep you training hard and pain-free for years. That’s the whole point of everything in this guide.
At Anaconda, we built our shoulder brace for athletes who protect their shoulders during weightlifting without slowing down. Use these strategies, use the right support gear when it counts, and keep adding weight to the bar.
FAQs
Still have questions? Here are the ones we hear most from athletes dealing with shoulder pain and rotator cuff injuries, as well as from those looking to stay injury-free.
Can I protect my shoulders during weightlifting without stopping training?
Yes, and that’s the goal. Most rotator cuff injuries and common injuries are caused by overuse and poor programming, not by training hard. Using dynamic stretches before sessions, maintaining proper form on every rep, and progressively loading lets you stay injury-free while continuing to build.
What is the most important thing for injury prevention in the shoulder?
Consistency with the basics beats everything else. A targeted warm-up with dynamic stretches, balanced pulling and pushing volume, and proper form across all pressing movements are the three pillars that protect shoulders during weightlifting more than any single piece of gear or exercise can alone.
How do I know if shoulder soreness is normal or a sign of a rotator cuff injury?
General post-session soreness that clears within 24 to 48 hours is normal. Persistent pain beyond 7 to 10 days, pain that disrupts sleep, limited range of motion on the affected side, or pain that returns after feeling pain-free are all signs that something more serious may be developing. Stop the aggravating movement and get a proper assessment before it becomes one of those rotator cuff injuries that costs you months of training.


