


If you've ever sat on the sidelines nursing a shoulder injury, you already know how brutal the waiting game gets. Every day out of training feels like a step backward, the frustration builds, and the question that keeps circling is the same one: How long is this actually going to take?
Here's the truth most guides won't tell you: Coming back too soon is just as damaging as never coming back at all. A rushed return doesn't just risk re-injury.
It risks a setback that's longer and more serious than the original one. The athletes who bounce back cleanest are the ones who follow a real, criteria-based plan and resist the urge to shortcut it.
At Anaconda, we build gear for athletes who refuse to quit. But we also know the difference between gutting it out and setting yourself back. Our shoulder support range is designed to keep you moving through every phase of recovery, from your first light loading sessions through the final push back to full training.
Key Takeaways
-
Recovery follows a sequence. Skipping phases is the #1 cause of re-injury.
-
Your injury type drives your timeline. A Grade 1 AC sprain and a post-surgical Bankart repair aren't even close to the same recovery.
-
Feeling good isn't clearance. Criteria-based return slashes re-injury risk compared to time-based return alone.
-
Rehab isn't optional. Range of motion and scapular control have to come before any loading.
-
Red flags during recovery are non-negotiable. Pushing through them turns a manageable injury into a serious one.
-
The mental side of coming back is a measurable risk factor, not a soft concern.
The Real Return-to-Training Timeline: Phase by Phase
Shoulder injuries aren’t rare. They account for 4.5 million physician visits in the US every year, and the range of problems behind that number is enormous.
What connects all of them is this: Recovery doesn’t follow a straight line, but it does follow a sequence with a structured, criteria-based progression. Skip that sequence, and you’re almost guaranteed to end up back at square one.
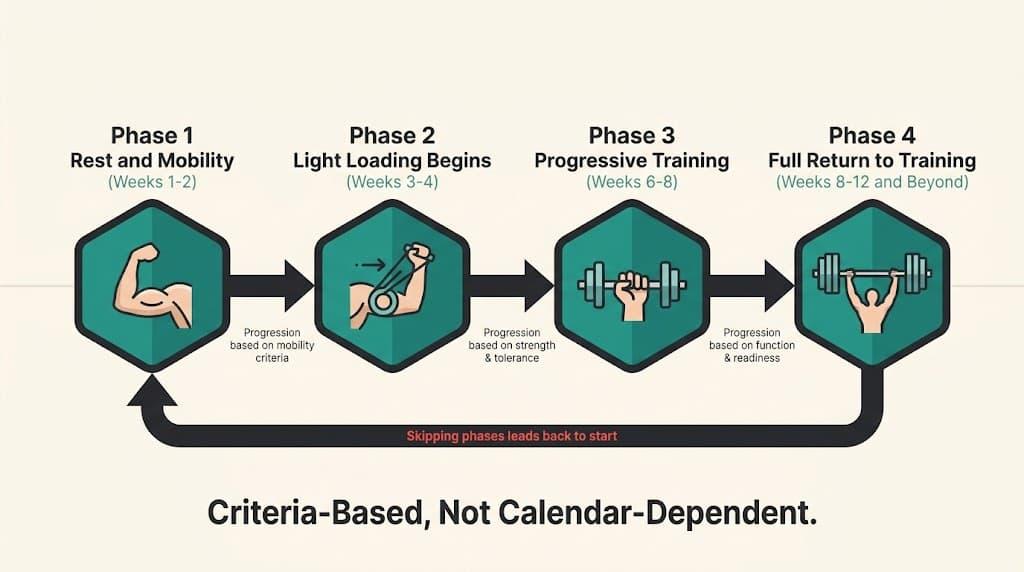
A realistic, conservative timeline for most non-surgical shoulder injuries usually falls into 4 phases, starting after medical clearance and continuing through rehabilitation within your treatment plan.
Phase 1: Rest and Mobility (Weeks 1-2)
The priority here is protecting the joint and knocking down inflammation. Avoid loading the shoulder entirely.
Start with early gentle movements to prevent stiffness and support the healing process, using slow, controlled drills that restore motion without putting too much stress on the joint. Begin gentle, passive range of motion work only: pendulum swings and assisted arm circles.
As tolerated, add shoulder blade squeezes as light mobility work. This phase isn’t wasted time. It’s the start of shoulder rehabilitation and the first step in a treatment plan that progresses from passive movements to active movements, so skipping it is a shortcut to a longer recovery, not a shorter one.
Phase 2: Light Loading Begins (Weeks 3-4)
A gradual return to physical activity starts here, but it starts carefully, with volume increasing before weight. Introduce pain-free resistance band work and isometric holds.
When returning to lifting weights, do not jump back to previous loads; increase resistance gradually so the shoulder can adapt. No overhead pressing. No heavy pulling.
If you experience pain, especially sharp pain, stop and avoid exercises that provoke it. The goal is to wake the surrounding muscles back up without aggravating healing tissue. Most setbacks happen in this phase because athletes rush it. This is the phase where patience pays.
Phase 3: Progressive Training (Weeks 6-8)
Structured rehab exercises return in this phase with controlled volume and deliberate progression. During shoulder rehabilitation, increase training loads by only 10-15% at a time.
Pressing movements can be reintroduced carefully, starting with lighter weights for more repetitions before heavier work, with low load and limited range. Strong shoulder blade control, rotator cuff function, and shoulder muscles are prerequisites before large compound lifts return.
Monitor your pain response after every session, not just during it. If soreness spikes the morning after a session, the load was too high. That’s not normal recovery. That’s a signal.
Phase 4: Full Return to Training (Weeks 8-12 and Beyond)
This phase is criteria-dependent, not calendar-dependent. Before resuming sports or lifting weights, the tissue must be structurally healed. Strength symmetry, pain-free movement, professional evaluation confirming ligaments or tendons are healed, and a shoulder that tolerates dynamic movements under stress are the real green lights, especially before contact sports or heavy training.
A specific week number isn’t. Surgical recoveries extend every phase significantly beyond these windows, and pushing through before criteria are met is the most common driver of re-injury among athletes who “did everything right.”
Not All Shoulder Injuries Heal on the Same Clock
Most recovery guides get this wrong because they treat every shoulder injury like a generic strain. They give you a rough number, you count the weeks, and you get back on the platform.
But your injury type matters enormously, and the research backs that up across the board. Overuse, repetitive movements, or sudden trauma can all put extra strain on the rotator cuff tendons, leading to pain and reduced function.
The rotator cuff is a vital group of muscles and tendons around the shoulder joint—supraspinatus, infraspinatus, teres minor, and subscapularis—that stabilizes the shoulder and allows for smooth movement.
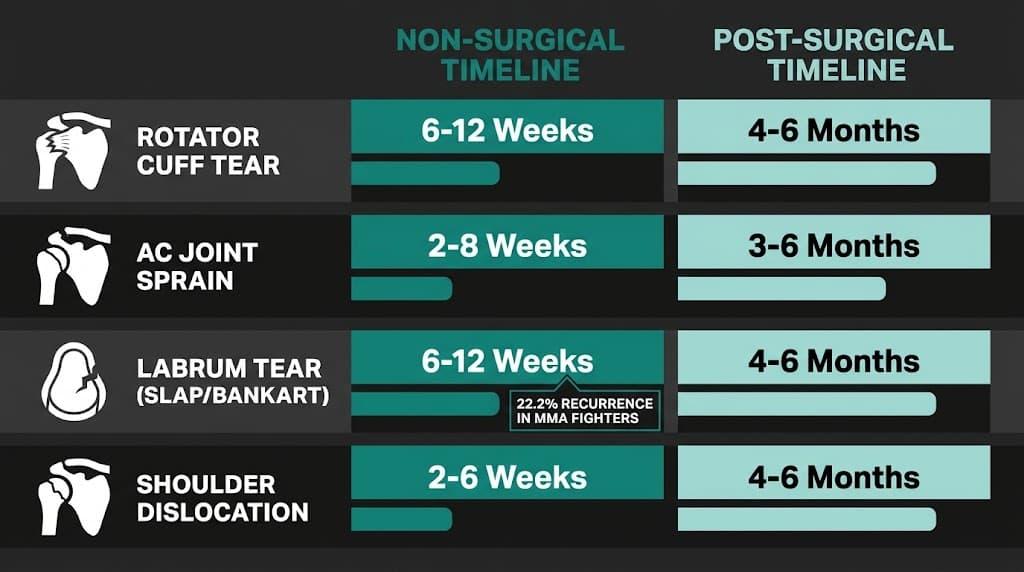
Here’s what the timeline actually looks like for the four most common shoulder injuries.
Rotator Cuff Tears
Rotator cuff injury cases split into 2 very different recovery paths. Partial tears may allow light loading by weeks 4-6 with conservative management. When training resumes, protect the cuff with a proper warm-up, proper technique, and gradual resistance increases. Full-thickness tears or post-surgical repairs push full return to training closer to 4-6 months. And that window is driven by criteria met, not time elapsed.
AC Joint Sprains
AC joint sprains are graded by severity, and that grade drives everything. Grade 1-2 sprains often allow return in 2-4 weeks with proper load management. Grade 3+ can require 8-12 weeks of structured rehab or, in some cases, surgical intervention before training resumes.
Labrum Tears (SLAP and Bankart)
Labrum tears carry some of the longest timelines in shoulder recovery. The non-surgical path may allow return in 3-4 months with consistent rehab. Post-surgical SLAP or Bankart repairs typically extend that window to 6-9 months.
It's also worth knowing that 22.2% of MMA fighters with shoulder injuries experience recurrence, with labrum tears being the most common injury at 41.2% of cases. Understanding how long shoulder injuries take to heal by specific injury type is one of the most important steps you can take before you even start rehab.
Shoulder Dislocations
Shoulder dislocations introduce a joint instability concern that outlasts the initial injury. A first-time dislocation without surgery may allow return in 6-12 weeks. Recurrent instability or surgical repair extends recovery to 4-6 months, with ongoing attention to joint control throughout the entire return process.
The table below summarizes these timelines. These are ranges, not guarantees. Individual factors, including age, tissue quality, training history, and rehab consistency, all shift where you land within these windows.
|
Injury Type |
Non-Surgical Timeline |
Post-Surgical Timeline |
|---|---|---|
|
Rotator Cuff Tear |
6-12 weeks (partial) |
4-6 months |
|
AC Joint Sprain |
2-4 weeks (Grade 1-2) |
8-12 weeks (Grade 3+) |
|
Labrum Tear (SLAP/Bankart) |
3-4 months |
6-9 months |
|
Shoulder Dislocation |
6-12 weeks |
4-6 months |
Rehab Isn't Optional: What Has to Happen Before You Train Again
Skipping rehab to get back faster is the most common mistake athletes make. It feels productive to push through.
It isn't. Structured rehabilitation exercises are what separate a clean return from a relapse, and the sequencing of that rehab matters just as much as the exercises themselves.
Restoring Range of Motion First
Before any loading happens, the range of motion has to come back. Passive work leads the way: Pendulum swings, cross-body stretches, and assisted arm circles. These movements restore tissue mobility without stressing healing structures.
Once passive range of motion improves, active range of motion work follows.
Only after both internal rotation and external rotation move freely and pain-free does progressive loading become appropriate.
This sequencing isn't optional, and it isn't up for debate.
Rebuilding Shoulder Strength and Stability
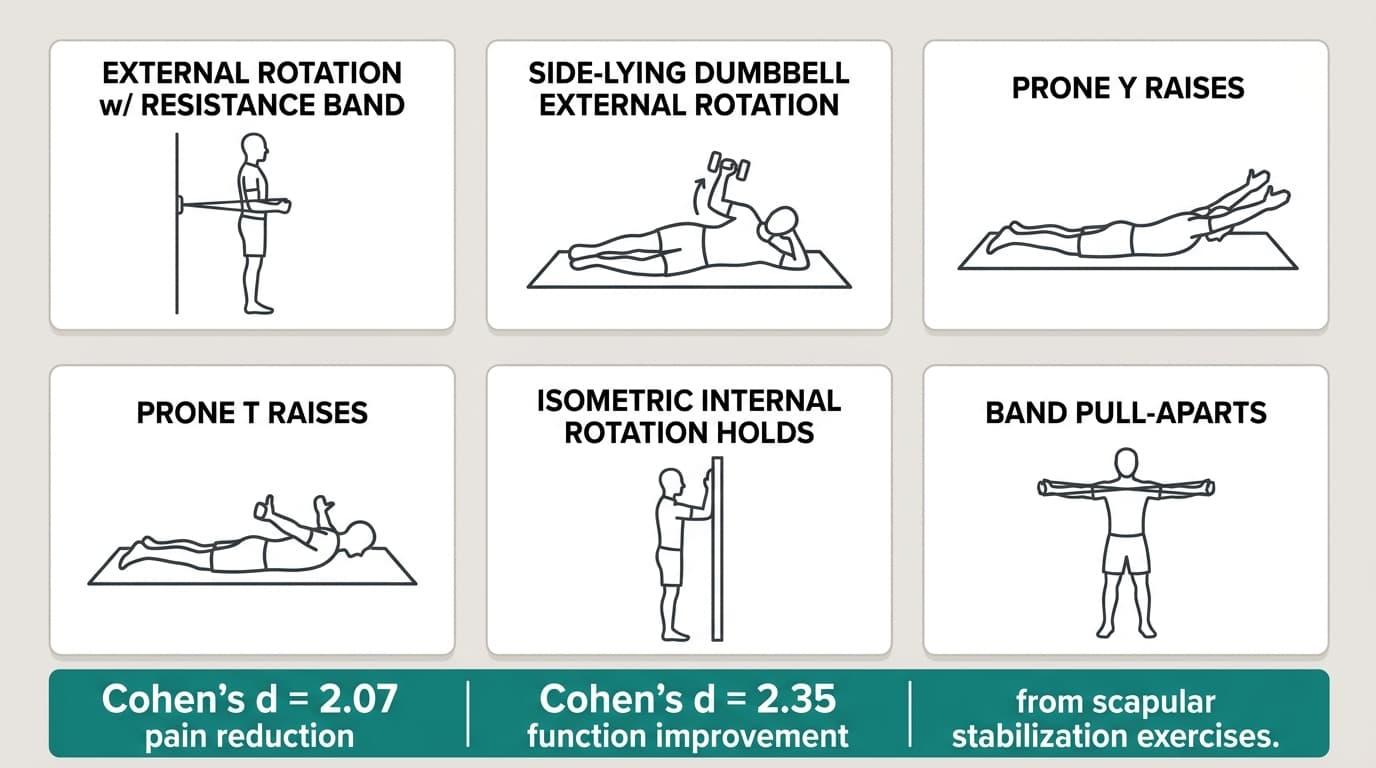
Strength work begins with the rotator cuff and scapular stabilizers, not the prime movers. This isn't just clinical advice. Scapular stabilization exercises show a large effect size in reducing pain (Cohen's d = 2.07) and improving function (Cohen's d = 2.35) in conservative rotator cuff rehab. That's not a marginal difference.
Scapular control must be established before any pressing movements are reintroduced. Without it, the shoulder joint absorbs a load it's not ready to handle.
The exercises below form the foundation of this stage:
-
External rotation with resistance band: Elbow at 90 degrees, slow and controlled tempo.
-
Side-lying dumbbell external rotation: Isolates the infraspinatus without loading the joint.
-
Prone Y raises: Activates the lower trapezius and builds scapular stability.
-
Prone T raises: Targets the mid-trapezius and reinforces scapular retraction.
-
Isometric internal rotation holds: Rebuilds rotator cuff tension without dynamic stress.
-
Band pull-aparts: Reinforce posterior shoulder and scapular control simultaneously.
Swap overhead pressing for neutral-grip movements initially, and reduce the range of motion on all pressing exercises until strength symmetry returns. Loading before you've earned it is how progress unravels.
Warm-Up and Cool-Down During the Return Phase
Warm-up and cool-down aren’t optional extras during the return phase.
They’re part of the session itself. Before every session, spend 5-10 minutes on a proper warm-up with dynamic movements like arm circles, band pull-aparts, and shoulder circles to improve mobility and prepare the shoulder muscles and joint after inactivity.
Cold tissue under load is a liability, and the return phase is not the time to cut corners. Safe return to the gym may require modifying movements to protect the joint capsule.
After every session, finish with passive stretching, joint decompression movements, and ice if soreness is present, and stretch regularly between sessions to maintain mobility.
Physical therapy guidance during this phase helps calibrate load and recovery between sessions so you don’t undo the progress you’ve built.
Feeling Good Isn't Clearance: Criteria-Based vs. Time-Based Return
Feeling decent after 8 weeks isn't clearance; iIt's hope. And hope isn't a return-to-sport protocol.
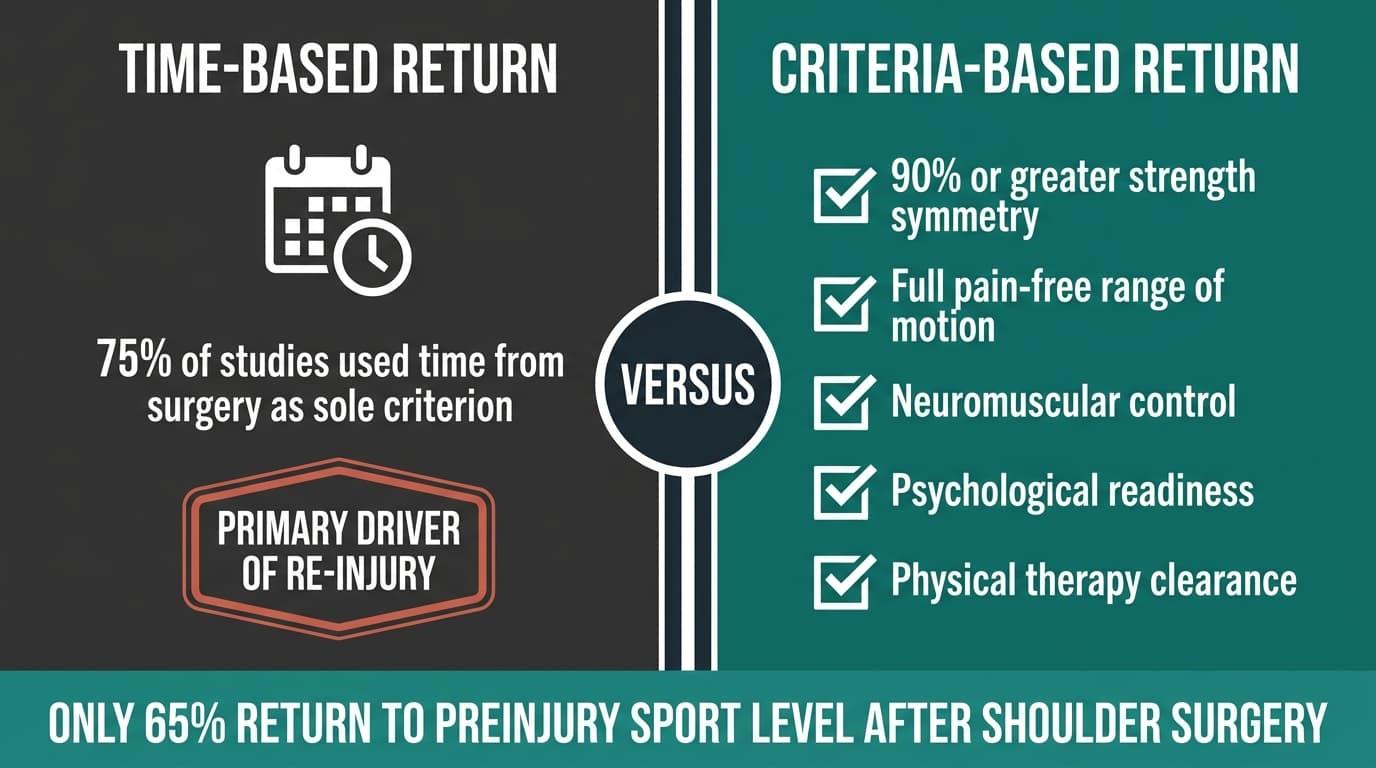
Time-based return is the default approach because it's easy. Count the weeks, feel decent, get back on the platform. But it's also the weakest standard available. A systematic review found that 75% of studies used time from surgery as the sole return-to-play criterion, even though that approach is a primary driver of re-injury in shoulder instability cases. Counting weeks isn't a protocol. It's a guess.
And here's what the research says about athletes who return without meeting functional benchmarks: Only 65% return to their preinjury level of sport after shoulder surgery, and psychological readiness is one of the strongest predictors of whether they get back there. Criteria-based return isn't extra. It's what separates a clean comeback from a relapse.
The benchmarks that actually matter for re-injury prevention include the following:
-
90% or greater strength symmetry compared to the uninjured side.
-
Full, pain-free range of motion without compensatory movement patterns.
-
Neuromuscular control demonstrated through sport-specific movement under load.
-
Psychological readiness with no apprehension during overhead or contact movements.
-
Physical therapy or sports medicine clearance based on objective testing, not self-assessment.
Surgical patients carry additional criteria before a gradual return to activity is appropriate.
Tissue healing timelines after stabilization procedures are longer, and loading too early undermines the repair entirely.
Self-assessed readiness isn't a benchmark. It's a bias. Get cleared by someone qualified to clear you.
Supporting Your Shoulder Through the Return Phase
The gap between structured rehab and full training is where most athletes get hurt again.
Not because they're weak, but because they removed all support before the shoulder was ready to handle it alone. Bridging that gap intelligently is what keeps the progress you've built from unraveling.
Why External Support Matters During Progressive Loading
During weeks 4-12, the shoulder is rebuilding under increasing load. Tissue is healing, but confidence and neuromuscular control are still catching up. External compression during this window provides proprioceptive feedback that helps the joint sense its position under load. That feedback reduces apprehension and allows controlled, progressive loading without the nervous system constantly bracing for failure.
The Anaconda Shoulder Brace is built for exactly this phase. Designed with 3D knit compression construction using polyester, nylon, and spandex, it manages residual inflammation while supporting joint stability during overhead pressing and other reloading movements. It moves with your shoulder, not against it. We've helped over 400,000 athletes through exactly this kind of return, and every order ships within 24 hours with a 30-day return guarantee.
How to Use a Shoulder Brace Without Creating Dependence
A brace is a transitional tool, not a permanent fix. Use it during training sessions in the progressive loading phase. Don't wear it passively throughout the day. The goal is to support movement under load, not replace the work the shoulder needs to do on its own.
As strength returns and re-injury prevention benchmarks are met, taper brace use gradually. The brace is the bridge. Full, unassisted training is the destination.
Red Flags: When to Stop Training and Reassess
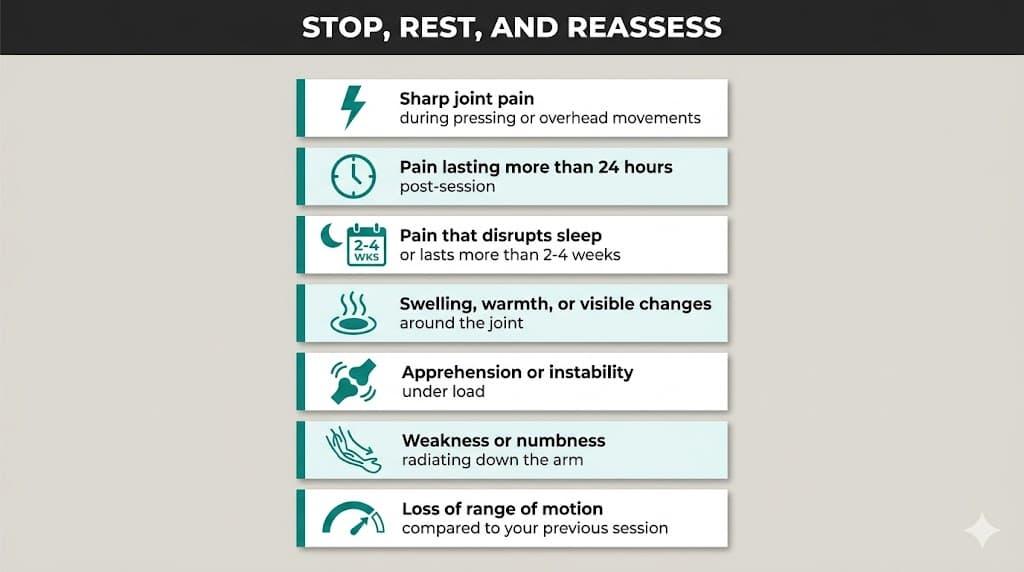
Not every ache during recovery is a signal to back off. Some signals, though, are non-negotiable. Pushing through these isn’t grit. It’s how a manageable injury becomes a serious one. These warning signs apply whether you’re in week 3 of rehab or week 10 of progressive loading:
-
Sharp joint pain during pressing or overhead movements: Muscle fatigue is expected. Sharp, localized pain inside the shoulder joint is not. Stop the movement immediately.
-
Pain lasting more than 24 hours post-session: Some soreness after training is normal. Pain that lingers into the next day means the tissue wasn’t ready for that load.
-
Pain that disrupts sleep or lasts more than 2-4 weeks: When symptoms interfere with daily activities or everyday tasks, the issue needs professional assessment rather than more guesswork.
-
Swelling, warmth, or visible changes around the joint: These are signs of active inflammation. Training through them accelerates damage, not recovery.
-
Apprehension or instability under load: The sensation of the shoulder giving way is a direct signal of joint instability, especially critical to respect after a dislocation; popping sounds can also warrant reassessment.
-
Weakness or numbness radiating down the arm: Nerve involvement or a rotator cuff tear can produce these symptoms. Neither should be trained through.
-
Loss of range of motion compared to your previous session: Regression in mobility is a red flag, not a bad day.
Any of these signs means one thing: Stop, rest, and consult a physical therapist, physiotherapist, or sports medicine doctor before continuing. These guidelines exist for a reason. Use them.
The Mental Side of Coming Back: Fear, Confidence, and Kinesiophobia
Physical healing and psychological readiness aren't the same thing. The gap between them is where re-injury happens, and it's a gap that most return-to-training guides ignore entirely.
Kinesiophobia, the fear of re-injury, is a clinically recognized barrier to safe return. It's not a weakness. It's a normal neurological response after a real injury.
Left unaddressed, it changes how you move, and not in your favor.
Research confirms that fear of re-injury increases the likelihood of recurrent dislocation in multivariate analysis, making it a measurable risk factor, not a soft one.
Signs that kinesiophobia may be affecting your training:
-
Guarding movement patterns unconsciously during pressing or overhead work.
-
Avoiding specific exercises entirely without a clinical reason to do so.
-
Training with constant apprehension, bracing for pain that may not come.
-
Hesitating under load even when strength has fully returned.
The numbers behind this are striking.
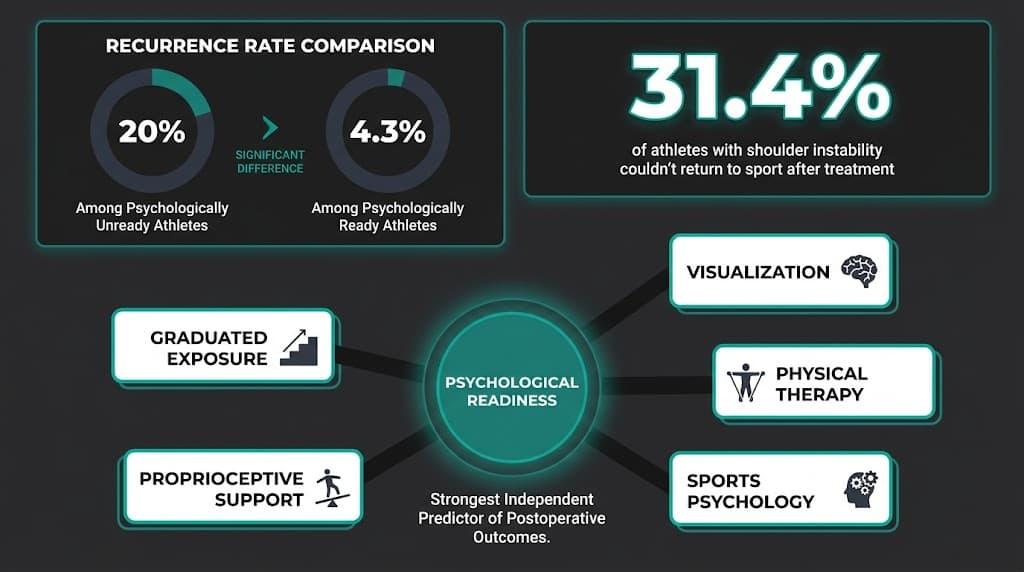
A study on athletes returning after shoulder stabilization surgery found that 20% of those who sustained a recurrence weren't psychologically ready, compared to just 4.3% of those who were. That's nearly a 5x difference. Psychological readiness was the strongest independent predictor of postoperative outcomes. That's not a soft finding. It's a number that should stop every athlete in their tracks.
It goes beyond individual studies. A systematic review of 844 athletes found that 31.4% of athletes with shoulder instability couldn't return to sport after treatment. The most consistent differentiator between those who made it back and those who didn't? Psychological readiness scores. Training through fear doesn't make you tougher. It makes re-injury more likely.
Strategies that rebuild confidence include the following:
-
Graduated exposure: Increase load and range of motion progressively under control.
-
Visualization: Rehearse successful movement patterns before executing them.
-
Physical therapy: Use sessions to build objective evidence that the shoulder is ready.
-
Sports psychology: Seek professional support if fear persists beyond physical clearance.
-
Proprioceptive support: Using a shoulder brace during recovery provides tactile feedback that can reduce apprehension during a gradual return to activity.
The mental component often lags weeks behind physical healing. Returning before resolving that fear doesn't make you tougher. It makes re-injury more likely.
Final Words
Returning to training is a process, not a date circled on a calendar. The athletes who come back cleanest are the ones who respect the sequence, meet criteria-based benchmarks before reloading, and treat re-injury prevention as the standard, not the afterthought.
At Anaconda, we built our shoulder support range for athletes who are serious about coming back stronger, not just coming back. Our shoulder brace gives you the stability to move with confidence through the progressive loading phase, with 24-hour shipping and a 30-day return guarantee so you can get started without risk.
Frequently Asked Questions
Dealing with a shoulder injury or trying to get back to lifting safely? Here are quick answers to the most common recovery questions athletes ask.
How do you get back into lifting after a shoulder injury?
Getting back into lifting after a shoulder injury should start with restoring pain-free movement first. Most athletes begin with mobility work, resistance bands, and controlled stability exercises before returning to heavy lifting. Compound movements should only come back once strength and movement quality feel balanced again. Progressing too fast usually increases the risk of reinjury.
Can you train back muscles with an injured shoulder?
Yes, some back exercises can still be trained with an injured shoulder, depending on the movement and severity of the injury. Neutral-grip rows and controlled horizontal pulling are often more tolerable than overhead or wide-grip pulling variations. Exercises that heavily stretch or rotate the shoulder under load are usually more irritating during recovery. It’s best to reintroduce pulling movements gradually and with professional guidance.
What are two warning signs of a rotator cuff tear?
Two common warning signs of a rotator cuff tear are noticeable weakness and sharp pain during shoulder movement. Many people struggle lifting their arms overhead or reaching behind their backs without discomfort. Unlike normal gym soreness, the weakness usually does not improve after warming up. Persistent symptoms should be evaluated professionally for proper diagnosis.
Is it safe to train through shoulder pain?
Mild discomfort during rehab can sometimes be normal, but sharp or worsening pain should not be ignored. Pain that lasts more than a day after training, swelling, or feelings of instability are strong warning signs. Training aggressively through those symptoms often delays recovery and increases tissue damage. If pain changes how you move or lift, it’s time to reassess your training.
How long does it take to fully recover from a shoulder dislocation?
Recovery from a shoulder dislocation can take anywhere from several weeks to several months depending on severity and treatment.
First-time dislocations without surgery may return to training within 6 to 12 weeks with proper rehab. More serious instability or post-surgery recovery often requires a much longer recovery timeline.
Full recovery depends on strength, stability, and pain-free movement returning before heavy training resumes. After dislocation, return should follow a phased approach from medical clearance through rehabilitation rather than a simple time countdown.


