

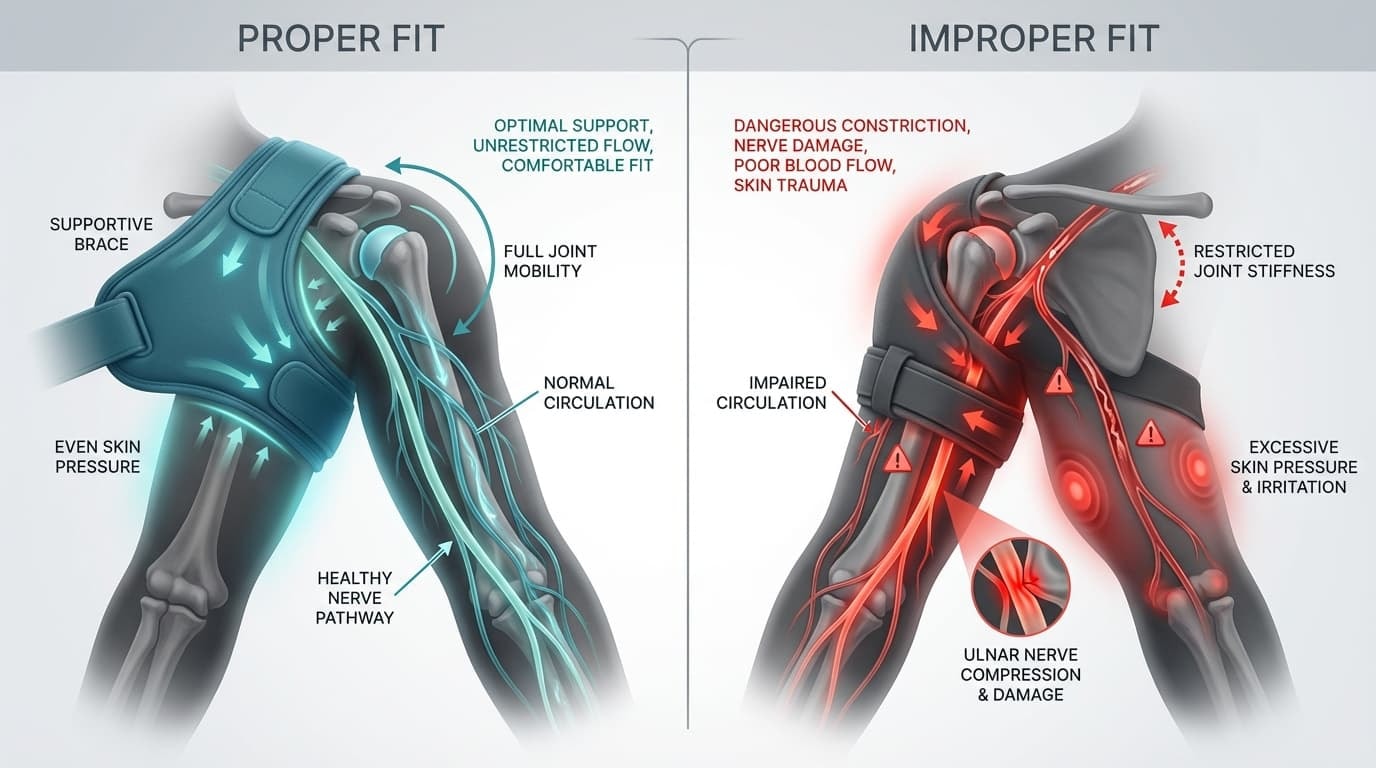
To put on a shoulder brace correctly, start with a neutral posture and the elbow bent at 90 degrees. Center the main support panel over the shoulder joint (acromion), secure the chest or torso anchor strap first to prevent slipping, and then gradually tighten the arm straps.
Proper fit ensures stability without restricting circulation or causing ulnar nerve compression.
Most of the time, the brace isn’t the issue. The setup is.
When a shoulder brace is worn correctly, it should feel secure without squeezing and supportive without limiting movement. When it’s off by even a little, it can quickly become distracting instead of helpful.
Anaconda was built by athletes who’ve trained through shoulder problems themselves. That real experience shapes how our gear is designed and tested for movement, pressure, and long training sessions, not just standing still.
This guide covers the essential fit protocols for athletes, including:
-
Why fit prevents nerve damage.
-
Step-by-step instructions for compression and stabilizing braces.
-
How to adjust tension for lifting vs. grappling.
-
Safety checks for circulation and range of motion.
Let’s get it fitted properly.
Key Takeaways
-
Start with clean, dry skin and follow the correct strap order—securing the base straps before fine-tuning support straps prevents slippage and uneven pressure during movement.
-
Keep your elbow bent at roughly 90°, with the wrist fully supported and the palm facing your trunk, to avoid ulnar nerve compression and circulation problems.
-
Fit is not one-size-fits-all: your brace must match your injury type (compression vs. stabilizing vs. sling) and body size, or it can worsen pain or create new nerve and skin issues.
-
After fitting, test your range of motion with sport-specific movements (pressing, pulling, overhead reaches) and adjust straps so the brace feels like support, not a rigid cast.
-
Stop immediately and contact a healthcare professional if the brace causes numbness, tingling, swelling, or changes in color in your hand or fingers.
Why Proper Fit Matters More Than the Brace Itself
We see this all the time. Someone buys a solid brace, straps it on fast, and assumes the job is done. But the way a shoulder brace is fitted matters more than the brace itself.
A poor setup can create new problems instead of helping with pain relief. That includes nerve irritation, stiffness, skin pressure, and loss of movement around the shoulder joint. None of those come from the brace alone. They come from how it’s worn.
Fit Mistakes Can Affect Nerves and Circulation
Positioning matters from the start. Clinical guidance recommends keeping the elbow at approximately 90 degrees, with the wrist neutral and the palm facing the body when applying a sling or immobilizer. When the arm hangs too low or flexes too sharply, nerve pressure increases.
Improper sling positioning frequently causes ulnar nerve compression if the wrist hangs outside the support pouch.
According to the Merck Manual, this misalignment increases pressure on the cubital tunnel, leading to numbness in the ring and little fingers.
Always ensure the wrist is fully supported and the elbow remains at a neutral 90-degree angle to maintain nerve health.
This is why we always check hand color, finger warmth, and grip movement after fitting. If circulation feels off, the setup needs to be adjusted immediately.
Poor Fit Increases Stiffness Risk
Aggressively immobilizing the shoulder can create another issue. Stiffness.
The same clinical guidance warns that shoulder immobilization can quickly lead to joint stiffness, which can progress to frozen shoulder if movement is restricted for too long.
That is why most training-focused braces aim to provide support without locking the joint completely. The goal is stability, not freezing the shoulder in place.
Strap Sequence Changes How Support Feels
Order matters when tightening.
Tightening the main strap before anchoring the brace forces the material to dig into the neck and armpit. Always secure the torso anchor first to distribute the load across the chest rather than the sensitive trapezius muscles.
A proper sequence allows the brace to evenly support the shoulder rather than pulling in one direction.
This matters even more for athletes managing rotator cuff injuries, where uneven tension can irritate already sensitive tissue.
Poor Fit Can Affect the Skin Too
Data from the National Institutes of Health (NIH) indicates that medical device-related pressure injuries account for roughly 30% of reported ulcers. While athletic braces are lighter, the friction mechanics remain the same: constant pressure on sweaty skin accelerates tissue breakdown.
While training braces are far lighter than hospital immobilizers, the lesson is the same. If straps dig in, twist, or sit on the same spot for hours, irritation builds fast.
Checking skin after training is part of responsible brace use, especially when sweating heavily or wearing the brace daily.
Sizing Matters More Than People Think
Not all braces fit every body type. Some immobilizers are designed within strict size ranges, meaning a brace that is too small or too large cannot distribute load properly, even if tightened correctly.
If the brace constantly slides, needs re-tightening, or fails to stay centered on the shoulder, it is often a sizing issue rather than a usage issue.
Choosing the Right Shoulder Brace
When your shoulder is acting up, the goal is not to shut everything down.
The goal is to choose the right level of support so you can keep moving without making things worse.
Not every brace is built for the same job. Some are meant to hold the arm still. Others are designed to let you train with control. Picking the wrong one can lead to stiffness, nerve irritation, or a brace that just gets in the way.
Here’s how we break it down.
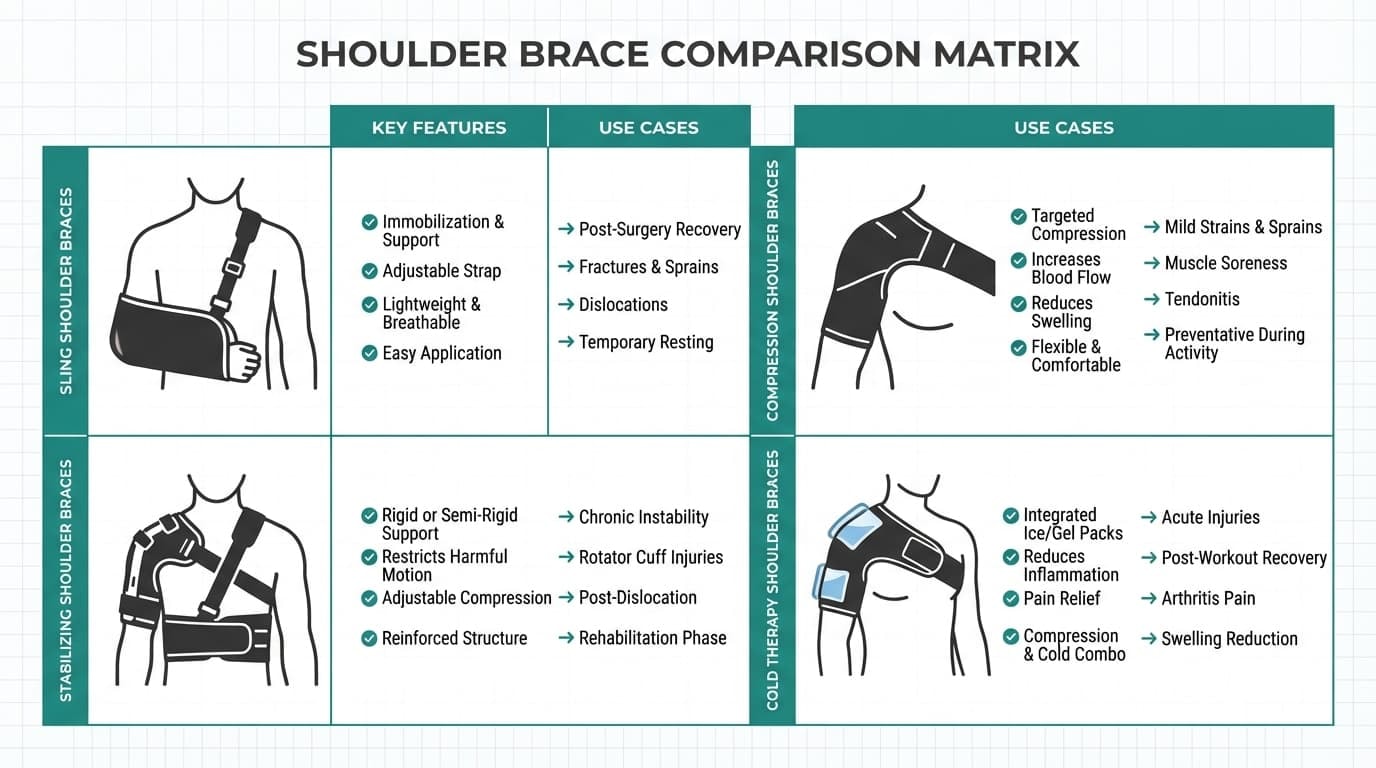
Sling Braces
Sling Braces are strict immobilization devices designed for the acute recovery phase following fractures, subluxations, or surgery. Unlike training braces, their primary attribute is motion restriction to prevent tissue stress.
Research indicates that poor sling positioning can exacerbate nerve irritation during the high-inflammation post-op period. These should never be used for active training; they are exclusively for resting the joint structure
As mentioned earlier, the elbow should be at around 90 degrees, with the wrist fully supported in the sling. When the sling is too short and the wrist hangs out, nerve compression can occur, often felt as numbness in the hand or fingers.
Research has also linked poor sling positioning to increased nerve irritation when swelling builds after injury or surgery.
That is why slings should be worn only under the guidance of a healthcare professional and for a short period. They are recovery tools, not training gear.
Compression Braces
Compression Braces are high-mobility neoprene sleeves designed to maintain therapeutic warmth and provide proprioceptive feedback during active training.
Unlike immobilizers, they allow for full glenohumeral rotation while applying steady hydrostatic pressure to manage inflammation. They wrap the shoulder, apply steady pressure, and provide support without locking the joint down.
Compression braces are commonly used for training through soreness, managing mild shoulder pain, and staying active while things calm down. They help create stability, improve comfort, and deliver everyday pain relief without turning your shoulder into a cast.
They are especially useful when the shoulder feels weak or unpredictable but still moves well. Many athletes wear them during lifting, drilling, or light sparring when the joint needs support, but full restriction would kill performance.
Because these braces stay close to the body, proper sizing matters. Too loose and they slide. Too tight and pressure builds fast. Most compression braces are safe to machine wash, which is helpful if you train often and sweat hard.
Stabilizing Braces
Stabilizing braces sit between compression sleeves and full immobilizers.
They use adjustable straps across the chest and upper arm to control movement in vulnerable positions. This is the type of brace athletes turn to after repeated instability, previous dislocations, or when returning to contact training.
Moreover, as noted in the study above, standard slings support the arm but do not prevent shoulder movement unless additional strap systems are used.
That is exactly what stabilizing braces do. They provide structure without fully shutting down motion.
For fighters, grapplers, and lifters, this means the shoulder stays supported when pressure hits but still moves naturally during transitions. The adjustable straps allow you to fine-tune tension depending on the session, heavier support on intense days, and lighter support during technical work.
Cold Therapy Braces
Cold therapy braces combine support with recovery control.
They include a built-in pocket for an ice pack so swelling and soreness can be managed without removing the brace completely.
These are not meant for live training. They are best used after sessions, during flare-ups, or on recovery days when inflammation builds up. Cold therapy helps calm irritation while the brace continues to provide support around the joint.
Ice should always be used in short intervals and never placed directly on bare skin.
How to Put On a Shoulder Brace Safely (Universal Setup)
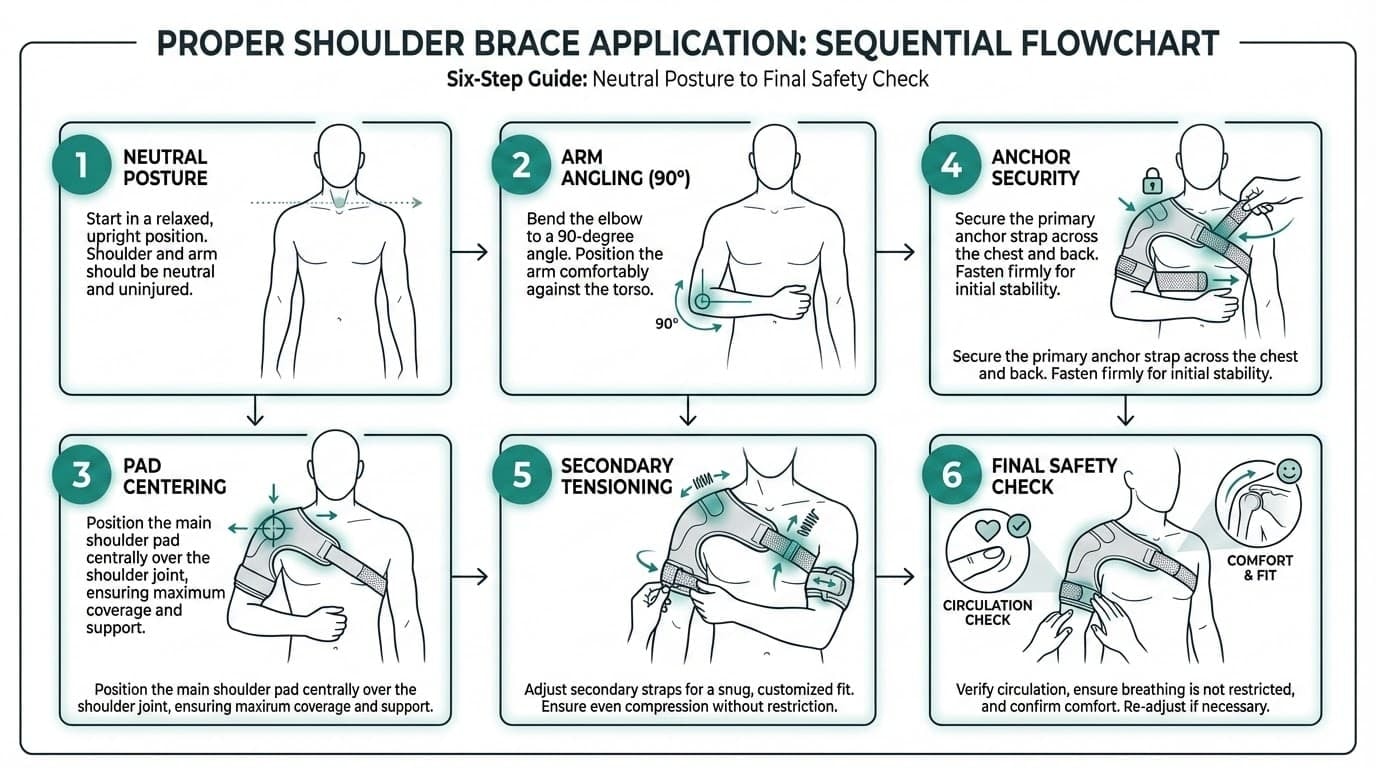
The Universal Setup Protocol consists of five non-negotiable steps: Neutral Posture, Arm Angling (90°), Pad Centering, Anchor Security, and Secondary Tensioning.
Following this exact sequence prevents the common 'slippage loop' where athletes constantly readjust the brace mid-session.
When we test braces in training, the difference between a brace that helps and one that becomes annoying usually comes down to these exact steps. Skip one, rush it, or tighten things out of order, and the brace starts sliding, digging, or pulling halfway through the session.
This universal setup keeps everything aligned before movement begins.
1. Start With a Neutral Posture
Before touching the brace, fix your posture first. Stand or sit upright, with your chest relaxed and your spine naturally stacked. Avoid rounding forward or pulling your shoulder up toward your ear, since both positions change how the brace sits once tension is added.
Most fit problems start here. If you tighten a shoulder brace while slouched or leaning forward, it will shift the moment you stand tall or begin moving.
In our Anaconda Fightwear R&D testing, we utilize the 'Mirror Check Protocol': stand before a mirror to confirm the clavicles are level. If the braced shoulder is hiked up toward the ear, the strap tension is already too high before training has even started.
If your upper traps already feel tight, reset. A neutral posture gives the brace a stable foundation and prevents unnecessary movement once training begins.
2. Set the Arm Angle Before Strapping
Bring your arm close to your body and bend the elbow naturally. You are not forcing an angle or pinning the arm down. The shoulder should feel loose and comfortable.
Most people naturally land close to a 90-degree bend. Your wrist should remain straight rather than curling inward or hanging downward.
If your arm feels strained before the brace is even on, stop and reset. The brace should support your arm position, not create it. Starting relaxed allows the brace to stabilize instead of pulling you into an uncomfortable position.
3. Place the Brace Before Tightening Anything
Position always comes before pressure.
Center the main support panel directly over the shoulder joint. It should not drift toward the chest or slide behind the shoulder blade.
If the brace includes a sleeve or wrap, check that:
-
Fabric lies flat against the skin or clothing
-
There are no twists or folds
-
Seams are not pressing into soft areas
At this stage, nothing should feel tight. This step is only about location. When the brace starts centered, it stays stable once tension is applied.
4. Anchor the Main Strap First
Every brace includes one strap that holds the entire system together. This is usually the chest strap, torso wrap, or main strap that prevents shifting during movement.
Secure this strap first and tighten it only until the brace stays in place. You should still be able to breathe comfortably and rotate your torso without resistance.
If the strap feels restrictive or pulls the brace upward into the neck, loosen it slightly. This anchor is meant to stabilize the brace, not lock your body down.
5. Tighten Secondary Straps Gradually
Once the main strap is secure, begin adjusting the remaining straps one at a time.
Pull slowly and stop early. After each adjustment, move your arm slightly to feel how the brace responds.
A good rule we follow during testing is simple:
Tightening one strap should not create discomfort elsewhere
If pressure builds in the neck, armpit, or upper arm, something is out of sequence. The brace should tighten evenly around the shoulder rather than pulling in one direction.
Balanced tension allows the brace to provide support without restricting movement.
6. Final Circulation and Comfort Check
Before training, always do a final check.
Open and close your hand. Wiggle your fingers. Make sure nothing feels numb, cold, or tingly. Your grip strength should feel normal.
Check pressure areas around the:
-
neck
-
armpit
-
upper arm
-
chest
You should feel secure without sharp pressure or digging sensations. If something feels slightly off while standing still, it will feel worse once you start sweating and moving.
Make small adjustments until the brace feels centered, balanced, and comfortable.
Once this baseline setup is complete, the final fit depends on the specific type of shoulder brace you are wearing.
How to Put On Each Shoulder Brace Type
When athletes experience shoulder pain, the instinct is usually to grab a brace and hope it helps. But different braces serve different purposes.
How you put each one on changes how it feels, how it stays in place, and how much support you actually get during movement.
Once you have your brace fitted correctly, dive into our more shoulder health and recovery articles to understand how to support your recovery long-term.
Below is how we approach each brace type at Anaconda based on real training experience and long sessions where comfort and stability matter.
Compression Shoulder Braces
Compression braces are the most common option for athletes dealing with shoulder discomfort during training.
We see them used when the shoulder feels sore, unstable, or unpredictable but still moves well. This includes situations where athletes experience pain during lifting, drilling, or repetitive work involving the upper arm.
How We Put It On
We start by slowly sliding the arm into the sleeve opening.
As the brace moves upward, we guide the compression panel so it sits directly over the affected shoulder. It should feel centered over the joint, not drifting forward across the chest or pulled toward the back.
If your brace includes straps:
-
Secure the torso or wrap strap first
-
Adjust the upper arm strap next
-
Fine-tune any cross straps last
At this stage, the brace should rest flat against the skin. No twisting. No bunching. No pressure points.
Once everything is aligned, we gradually tighten the brace until it feels secure.
What It Should Feel Like
A compression brace should feel supportive without squeezing.
You may still experience shoulder pain during movement, but the brace should help reduce the sensation of instability that often makes a painful shoulder feel worse during activity.
A correctly fitted compression brace avoids three critical failures:
-
Range of Motion (ROM) Restriction: It must not block overhead reaching or cross-body adduction.
-
Axillary Impingement: It should not dig into the armpit, which can sever circulation.
-
Cervical Strain: It must not pull the neck downward, which creates tension headaches.
The Anaconda Shoulder Brace is built specifically for this category. It is designed to stay in place through sweat, rotation, and long training blocks without constant readjustment.
Compression braces are commonly used when athletes:
-
Experience joint pain during repetitive training
-
Notice that shoulder pain persists after sessions
-
Feel weakness in the shoulder muscles
-
Want added confidence without restriction
If the brace constantly slides, sizing or positioning usually needs adjustment.
Stabilizing Shoulder Braces
Stabilizing braces are used when the shoulder needs more structure.
These are common among athletes who feel instability under pressure, especially during contact, pushing movements, or transitions where the upper arm is forced into awkward angles.
How We Set It Up
We begin by placing the main shoulder pad directly over the shoulder joint.
Once centered, we fasten the chest strap lightly. This acts as the anchor point and keeps the brace from drifting during movement.
Next, we wrap the strap around the upper arm, keeping it flat against the skin.
From there, we slowly tighten additional straps, one at a time. We keep the elbow close to the body during setup to avoid pulling the shoulder out of position.
What It Should Feel Like
A stabilizing brace should feel structured, not locked.
It should help manage movement when pressure increases, especially when athletes experience shoulder impingement sensations or instability during lifts and grappling.
You may still experience pain during training, but the brace should reduce the feeling that the shoulder is about to shift or collapse.
Athletes often choose stabilizing braces when:
-
Shoulder pain persists despite lighter support
-
The affected shoulder feels unstable under load
-
Severe pain appears only in certain positions
-
The left shoulder or dominant side absorbs repeated impact
These braces are commonly adjusted per session. Tighter for heavy days. Loser for technical work.
Shoulder Slings and Immobilizers
Slings are not training gear.
They are designed for moments when the shoulder needs rest and controlled positioning during daily activity.
How We Fit a Sling
We place the forearm fully inside the pouch so the elbow sits comfortably bent.
The wrist must be supported inside the sling. If the hand hangs outward, it can increase arm pain and pressure through the forearm.
The strap is routed over the opposite shoulder or neck, depending on design, then adjusted until the arm feels supported rather than hanging.
If the sling includes a waist strap, we secure it loosely to limit swinging while walking.
What It Should Feel Like
The arm should feel supported, not pulled downward.
Poor sling positioning can increase discomfort and even lead to referred pain into the neck or upper back when worn too long.
Slings are typically used when athletes
-
have severe pain with basic movement
-
cannot comfortably raise the arm
-
need temporary support following trauma
They should always be used under guidance from a healthcare professional and are not intended for sport or gym use.
Cold Therapy Shoulder Braces
Cold therapy braces combine support with recovery comfort.
They include a built-in pocket for an ice pack that keeps the shoulder supported.
How We Use Them
We secure the brace first, so it fits comfortably around the shoulder.
Once positioned, we insert the ice pack into the pocket so it rests over the painful shoulder or irritated area.
Placement matters. The pack should stay centered and not slip when standing or walking.
When These Are Helpful
Cold therapy braces are often used:
-
After intense training
-
When swelling builds in the upper arm
-
During flare-ups of shoulder impingement symptoms
-
When soreness spreads as referred pain
They are not designed for lifting or live training.
These braces are best used during cooldown periods as part of overall recovery habits.
How Should You Adjust the Brace Fit for Training?

Once your shoulder brace is set up correctly, the real test begins when training starts.
This is where fit either holds strong or slowly falls apart under movement, sweat, and fatigue.
A brace that feels perfect while standing still can behave very differently once you begin lifting, grappling, or drilling. That does not mean the brace is wrong. In most cases, it means the setup has not been adjusted for real training conditions.
At Anaconda, everything we design is tested during live movement, not just during rest.
That experience shapes how we think about fit once training intensity increases.
Dialing In Fit for Lifting Sessions
Strength training places constant load through the shoulder, especially during pressing, pulling, and overhead work. Even small fit issues become obvious when weight is added to the movement.
Before lifting, we always make sure the shoulder is in a neutral position and that the brace feels stable without forcing posture. The arm should feel supported, not pinned backward or pulled forward unnaturally.
If the brace is too loose, it will begin sliding during sets. If it is too tight, it may pull the shoulder upward, creating unnecessary tension in the neck.
During warm-up sets, pay attention to how the brace responds as the arm moves up and down.
If pressure builds early, it will only increase as fatigue sets in.
Our rule is simple. The brace should move with the shoulder, not fight against it.
Fit for Grappling and Contact Training
Grappling introduces a completely different challenge.
Constant rotation, pressure from partners, and unpredictable angles all test whether the brace stays secure.
During contact sessions, we typically set the main strap slightly firmer than during lifting. This helps prevent the brace from twisting or slipping when frames, grips, and pulls are in use.
The goal is stability without restriction.
You should still be able to rotate, reach, and defend without feeling trapped.
If the brace shifts during scrambles or rolls, it often means the anchor strap is not secure enough. Once the brace begins rotating, it can quickly cause shoulder discomfort and distraction.
A properly fitted brace should stay aligned even when training gets chaotic.
Managing Sweat and Fabric Movement
Sweat changes how every brace behaves.
As materials become wet, compression can loosen, and straps may gradually relax.
This is normal during longer sessions, especially in warm environments or high-intensity rounds. What matters is catching those changes early before the brace loses support completely.
Mid-session, we recommend doing a quick check:
-
Smooth any folded fabric
-
Lightly retighten loosened straps
-
Confirm the brace remains centered over the shoulder
While athletic braces are far lighter, the principle remains the same. Where sweat and pressure meet, discomfort builds faster.
Mid-Session Adjustments That Actually Help
Adjusting your brace during training is not a mistake. It is part of using it correctly.
If the brace drifts downward, reposition it before tightening anything. Pulling straps tighter without resetting the location often makes the problem worse.
When pressure builds near the neck or collarbone, slightly loosen the top strap and redistribute tension through the chest or torso strap instead. This keeps support centered rather than concentrated in one area.
If the affected arm begins to feel heavy or fatigued, reset the arm position before continuing. The brace should support your posture, not compensate for it.
Small adjustments early can prevent shoulder pain that lingers long after training ends.
When Training Fit Affects Sleep
Fit issues do not always show up immediately. Sometimes they appear later that night.
If you consistently wake with a painful shoulder, daytime brace positioning may be contributing to lingering tension or fatigue. This is especially common for athletes who train hard and then sleep on their side.
Using a body pillow can help support the affected arm and prevent the shoulder from collapsing forward. A thicker pillow may also help maintain shoulder height and reduce overnight strain.
Whether sleeping on your back or your side, aim to keep your shoulder in a neutral position rather than letting it fall into an awkward position.
Good recovery depends on good rest. A good night’s sleep matters as much as the training itself.
Common Training Fit Issues and Simple Fixes
Below is a quick reference based on what we see most often during real sessions.
|
Issue |
What’s Happening |
What Helps |
|
Brace sliding |
Sweat-reducing grip |
Slightly tighten the main strap |
|
Neck pressure |
Upper strap too tight |
Loosen the top strap, anchor the chest |
|
Arm fatigue |
Poor arm position |
Reset to neutral position |
|
Armpit rubbing |
Fabric twisted |
Smooth the sleeve before tightening |
|
Support fading mid-session |
Strap relaxation |
Quickly retighten between rounds |
These fixes take seconds but make a noticeable difference by the end of training.
Risks and Limitations When Training With a Shoulder Brace
A shoulder brace is meant to support training, not replace the joint's natural movement.
One common issue is stiffness. Wearing a brace during low-risk activities can reduce natural shoulder movement. Over time, this may leave the joint feeling tight at the start of training sessions, especially during warmups or overhead work.
Immobilization presents another limitation. While restricting movement is sometimes necessary early in recovery, long periods of limited motion can cause the shoulder to lose coordination. The goal is stability, not locking the joint in place.
Fit problems also matter. A brace that is too tight may create pressure around the neck or upper arm, while one that is too loose can shift during movement and rub the skin. These small issues often become distractions once sweating and intensity increase.
Key limitations usually come from:
-
Wearing the brace longer than needed
-
Using maximum tightness instead of balanced tension
-
Relying on support during activities that do not require it
A shoulder brace works best when used with intent. It should support movement, not restrict it unnecessarily or become something the shoulder depends on full-time.
When to See a Professional
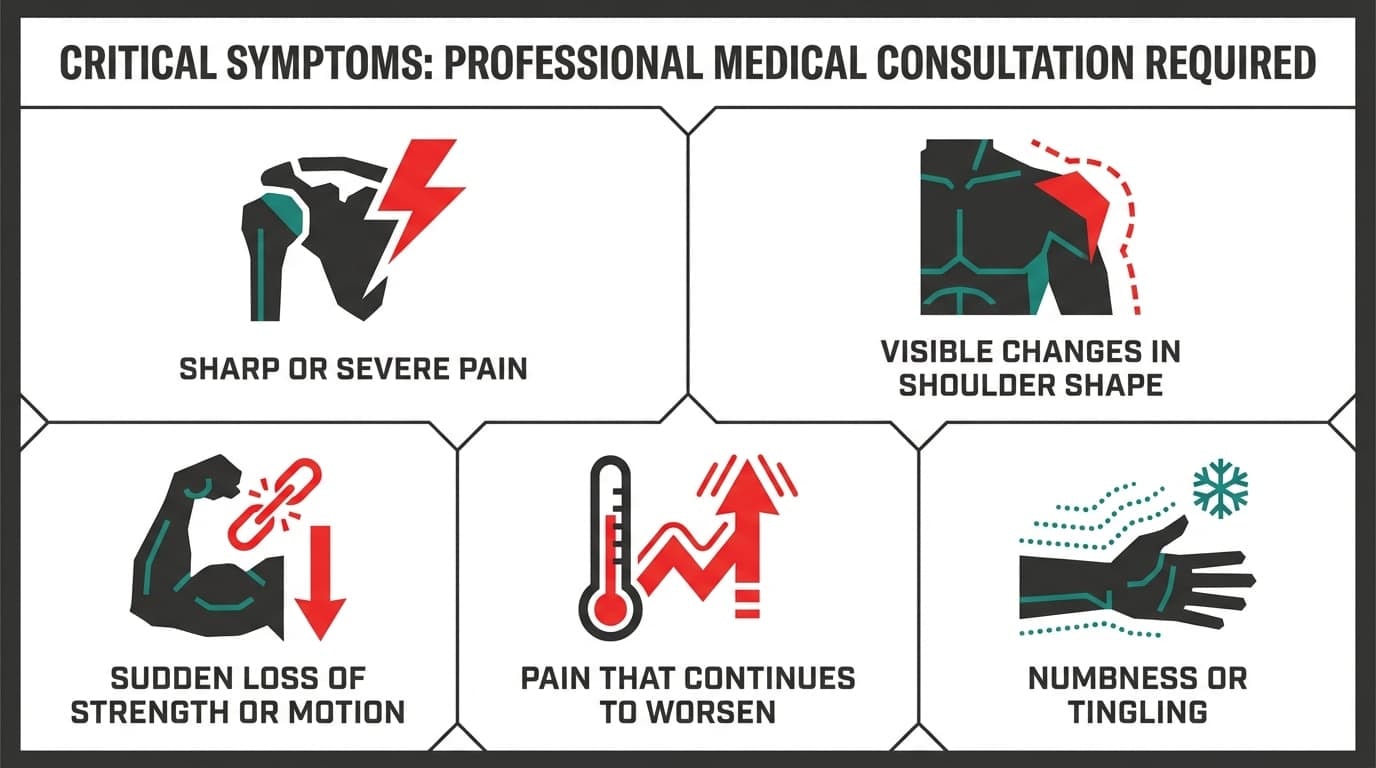
Most training-related shoulder issues improve with proper setup, load control, and time. However, some signs should not be ignored.
Seek professional guidance if you notice:
-
Sharp or severe pain after a fall or impact
-
Visible changes in shoulder shape or alignment
-
Sudden loss of strength or motion
-
Numbness or tingling traveling down the arm
-
Pain that continues to worsen despite adjustments
Getting clarity early helps prevent longer setbacks. Knowing when to adapt training and when to pause is part of staying in the game long term.
Final Thoughts
Shoulder pain rarely comes from one moment. It often builds through training load, recovery habits, and even sleeping position. That is why many athletes experience morning shoulder pain and start looking for ways to relieve it after waking up.
When alignment is off overnight, stress can shift across the shoulder joint, rotator cuff, and shoulder blade, sometimes radiating toward the upper arm bone. Left unchecked, this can lead to persistent shoulder pain that undermines training confidence.
Wearing a brace correctly does not replace recovery, but it can help manage shoulder pain by improving control and reducing unnecessary strain during movement.
The Anaconda Shoulder Brace is built for athletes who want stable support without sacrificing mobility. Used correctly, it supports smarter training while you rebuild strength around the shoulder joint and stay consistent long term.
FAQs
Fast answers to help you protect your shoulder and train smarter.
Can I sleep with my shoulder brace on?
Yes, but only in specific situations. Sleeping with a brace is usually recommended after surgery or acute sprains, and should be guided by a professional. For everyday support, overnight wear is optional and depends on comfort. If the brace feels tight, digging, or affects circulation, remove it and reset your sleeping position.
Can I lift weights or play sports while wearing a shoulder brace?
Yes, if the brace is designed for training use. Many athletes use braces to stabilize the joint and maintain stability during lifting or sports. Start light and increase intensity slowly while monitoring comfort. If pain increases or movement feels restricted, stop and reassess fit and activity level.
Which side should the strap cross if I’m using a sling?
The strap should cross over the opposite shoulder from the injured side. For example, a left shoulder injury usually routes the strap to the right. Correct strap location prevents neck pressure and keeps the device balanced. Always follow the manufacturer’s setup details for your specific sling.
How tight should my shoulder brace feel?
The brace should feel snug but not restrictive. You should be able to slide two fingers under the strap without discomfort. If the brace causes numbness, rubbing, or skin irritation, it is too tight. Proper tension helps manage support without limiting circulation.
How do I know if I need a medical-grade immobilizer instead of a soft brace?
You may need an immobilizer if you have severe pain, visible deformity, or cannot lift your arm. These devices are typically used after fractures, dislocations, or major tendon injuries. If symptoms worsen or do not improve, seek professional guidance. Choosing the right support protects long-term shoulder health.


