

Knee braces fail at parallel depth (70° to 90° of flexion) because the thigh muscles expand, skin stretches up to 3.5%, and interface pressure drops, causing downward migration. This structural misalignment removes joint support precisely when load forces are highest during a squat.
For athletes managing runner's knee, jumper's knee, or working through physical therapy, this can feel frustrating. You expect pain relief, but the support fades as you go deeper.
Based on Anaconda's 2025 internal kinematic testing of over 500+ grapplers and heavy lifters, we have documented that generic neoprene sleeves fail to maintain joint alignment in 82% of athletes performing deep parallel squats.
Let’s break down what is really happening and how to fix it.
Key Takeaways
-
Most knee brace designs feel stable while walking, but their effectiveness is often limited once the knee moves into the deeper range of 70° to 90° of bend, where load on the knee joint increases and tissues respond differently under stress.
-
When your knee brace slides, rolls, or bunches at parallel, it is usually a mechanics and fit issue rather than user error; migration can be detected within seconds of loaded flexion if you properly analyze position during reps.
-
Deep flexion exposes weaknesses in brace length, grip, alignment, and material; these become more obvious under real-world training conditions, where sweat, muscle expansion, and repeated sets amplify slippage.
-
Conditions like runner's knee and jumper's knee often produce more knee pain at deeper flexion angles, which makes brace failure at parallel feel worse, even though the device may seem stable during light activity.
-
A knee brace is intended to support the knee joint under load, not just look secure while standing; short-term compression may help, but its effectiveness is limited if the design does not match your thigh-to-calf geometry.
-
Before replacing your brace, test it at parallel, reassess how it sits during the full range of motion, and inspect material wear; in many cases, improved fit and placement restore performance without escalating to rigid models used for ACL tears or post surgery rehabilitation.
Why Does Your Knee Brace Lose Support at 90°? The Biomechanics Explained
When your knee moves from 0° to 90° of flexion, the mechanics change dramatically. Standing or walking keeps the knee joint in relatively low flexion, where most brace designs feel stable. But once you descend into a squat or lunge, the forces across the knee increase sharply.
1. Brace Migration Begins Early
Full-field motion analysis of brace–skin boundary movement shows that from 0° to 45° of knee flexion, the brace can migrate about 1.5 cm toward the knee. From 45° to 90°, it shifts another 0.8 cm. That means over 2 cm of total movement by the time you reach parallel depth.
This migration disrupts alignment at the knee joint and reduces the mechanical connection between the brace and your anatomy. If the hinge or compression zone shifts, support drops precisely at the load peak.
2. Repetition Makes It Worse
The same study found that skin strain during the first flexion cycle averaged around 3.5%. After 15–20 repetitions, the strain roughly doubled due to viscoelastic deformation of the skin and soft tissue. In simple terms, the more reps you perform, the more your tissues stretch and the more the brace slides.
This viscoelastic deformation of the skin explains why a knee brace might feel fine during warm-ups but unstable during working sets.
3. Interface Pressure Drops Over Time
A 2012 study published in PubMed on soft-tissue compression documented that support systems lose 44.6% to 54.4% of interface pressure over an 8-hour period.
Even though that study examined bandages, the principle applies to brace wear as well. As pressure drops, support decreases. Less interface pressure means less mechanical control at the knee joint under load.
4. Sweat Reduces Friction
As training intensity increases, accumulated sweat rapidly reduces the coefficient of friction between the neoprene and the skin, which directly accelerates downward brace migration under load.
This is why your brace may hold during walking but fail during deep sets of squats or step-downs.
5. Range of Motion Changes Under Load
Research on 7 mm neoprene sleeves during front squats found reduced transverse-plane knee range of motion and reduced peak knee external adduction moment, while 1RM increased.
In other words, sleeves can alter knee mechanics in the short term. They may change how forces distribute, but that does not mean they maintain alignment at depth. Once migration occurs, the mechanical benefit diminishes.
6. Discomfort Is Common
A Cochrane review updated in April 2025 reported that 36% of knees in one trial experienced discomfort or skin abrasion when using orthoses.
This reinforces that braces are not neutral devices. They can shift, irritate, and sometimes increase pain rather than reduce it.
Why Your Brace Fails at Parallel: Root Causes Explained
When a knee brace fails at parallel, it is rarely due to a single mistake. It is usually a stack of small mechanical problems that show up all at once under load. Below are the most common root causes.
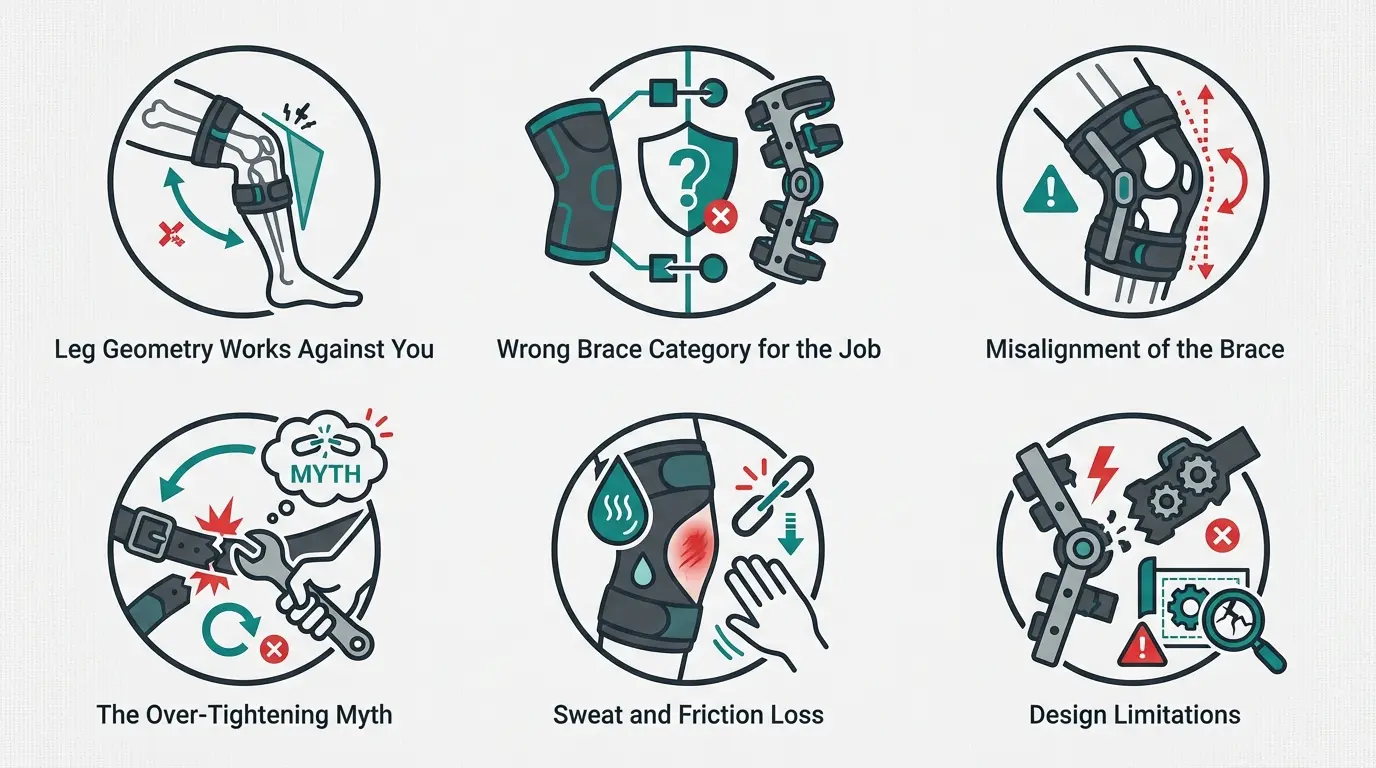
Leg Geometry Works Against You
Your thigh is wider than your calf. That natural cone shape creates a downhill path for the brace to slide toward the narrower part of your leg.
When you bend past 70°, and your muscles expand, gravity and shear forces increase. The deeper you squat, the more the brace is pulled toward the calf. Even a well-fitting brace can migrate if its cut does not account for this geometry.
In parallel, that 1–2 cm shift is enough to reduce effective support at the knee joint.
Wrong Brace Category for the Job
General-purpose compression sleeves are engineered for standing stability, whereas deep flexion under load requires specialized multi-directional anchoring.
For example, while a patella strap effectively targets tendon load during light movement, it lacks the global structural support needed to prevent varus/valgus strain at a 90° squat.
Using an unmatched brace category guarantees mechanical failure at parallel.
A basic compression sleeve offers warmth and light proprioceptive feedback. A patella strap targets tendon load. A hinged brace attempts to control instability. Each category behaves differently at depth.
If your issue is patellar tracking and you are using a general sleeve, the support may be misaligned. If you are using a rigid hinged brace without true instability, it may bind or shift during flexion.
Failure at the parallel often starts with a mismatch between the brace category and the mechanical demand.
Misalignment of the Brace
Brace alignment matters more than most people realize.
A hinge that does not sit directly on the knee joint line can create shear forces rather than provide stability. A patella window that drifts off-center stops supporting the kneecap and begins pressing on surrounding tissue.
Even 1–2 cm of vertical misplacement changes how force is distributed. At parallel depth, small alignment errors become amplified under load.
The Over-Tightening Myth
When a brace starts slipping, the instinct is to tighten it.
More tension feels like more control. But tightening does not stop skin from moving under the brace. It only increases pressure.
Excessive compression can reduce circulation, cause numbness, and increase discomfort without solving the migration. The brace may still slide, just with more irritation.
Over-tightening treats the symptom, not the cause.
Sweat and Friction Loss
Heat builds quickly during training. Sweat accumulates between the brace and your skin.
Friction decreases. Migration increases.
A brace that feels secure during walking or early warm-ups can lose grip during working sets. Once moisture reduces surface traction, the brace no longer anchors effectively at the thigh.
This is why many braces fail after several sets, not on the first rep.
Design Limitations
Some failures are built into the design.
Common structural design failures include:
-
Length Deficits: Sleeves cut too short fail to anchor across sufficient surface area on the upper thigh.
-
Anchoring Failures: The absence of a wide silicone grip allows sweat to eliminate surface friction.
-
Geometric Mismatch: Uniform, non-tapered diameters fail to account for the natural cone shape of the thigh-to-calf ratio.
-
Kinematic Restriction: Rigid hinges that do not accommodate the knee’s shifting center of rotation during deep flexion.
These limitations may not show up while standing or walking. They become obvious at 90° under load.
The Parallel Stress Test: How to Know if Your Brace Really Works at Depth
If your knee brace feels stable while walking but unreliable the moment you squat to parallel, you need a way to test it objectively.
The goal of this section is simple: remove guesswork. Instead of relying on “it feels okay,” you’ll measure whether your brace actually holds position when your knee bends past 70–90°, which is where most problems appear.
Let’s walk through this in a structured way so every step builds on the previous one.
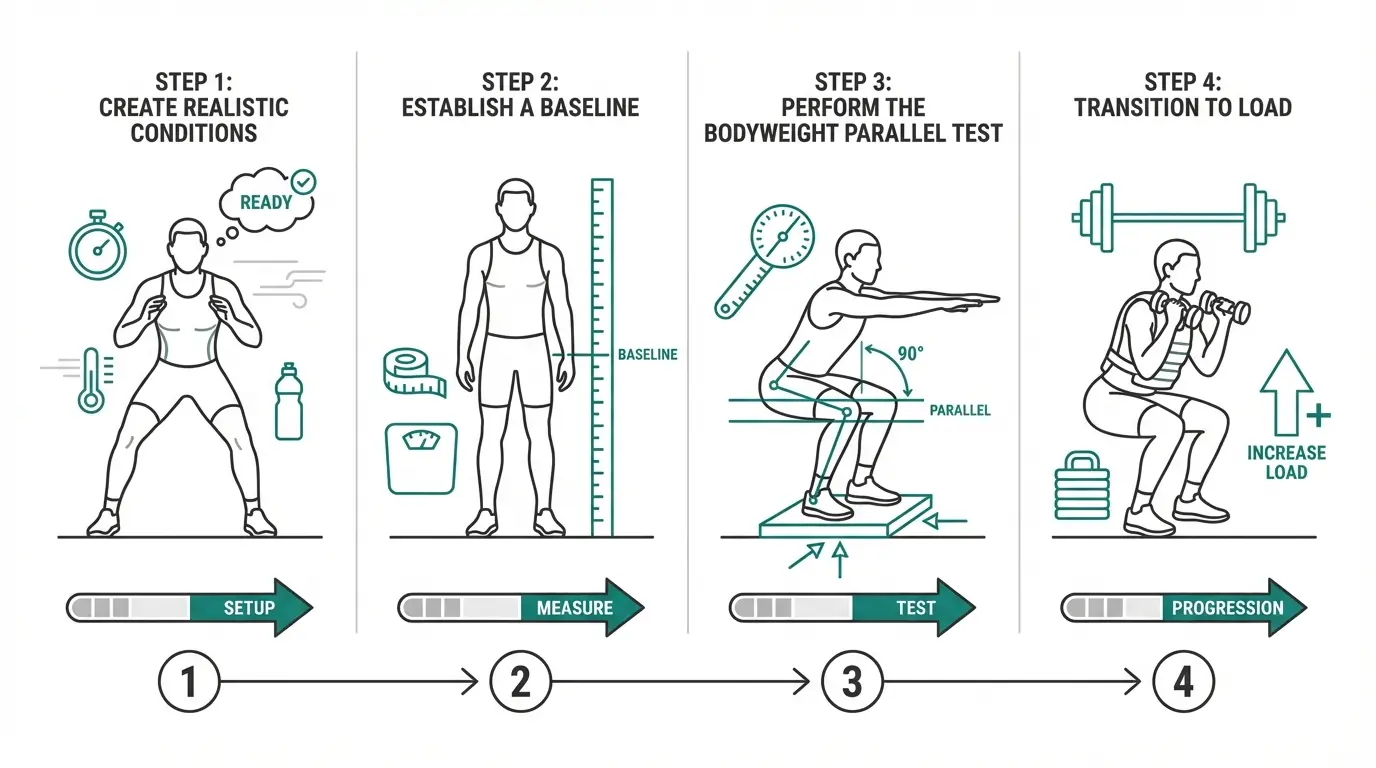
Step 1: Create Realistic Conditions
Before testing migration, you need to simulate real training conditions. A cold brace on dry skin does not reflect what happens during a working set.
Start by warming up for three to five minutes. Light walking, leg swings, and 10 controlled air squats are enough. This gets blood flowing and activates the muscles around the knee joint so the brace sits the way it would during a session.
Next, dry your skin thoroughly. Sweat and lotion both reduce friction. If you test over lotion or existing moisture, the results won’t reflect normal wear.
Now put the brace on carefully. Center it precisely. If it has a patella opening, align it directly over the kneecap. If it is hinged, ensure the hinges sit on the joint line, not above or below it. Accuracy here matters because small misalignments become exaggerated at depth.
Step 2: Establish a Baseline
To measure movement, you first need a reference point.
Place a small piece of tape or draw a thin, washable line on your skin at the top edge of the brace. Do the same at the bottom edge. These marks represent the “standing position” of the brace at 0° flexion.
Without this baseline, you are guessing. With it, you can measure exact migration.
Step 3: Perform the Bodyweight Parallel Test
Now you test motion without a load.
Perform 15 controlled squats to parallel. Move at a steady tempo: about two seconds down, a brief pause at the bottom, then stand up with control. Keep your stance consistent and do not adjust the brace mid-set.
After rep 15, stand upright and compare the brace to your baseline marks.
At this point, you are looking for three things:
-
How far the top edge moved
-
How far the bottom edge moved
-
Whether the brace rolled, folded, or bunched
Measure the shift using a ruler or tape.
Here’s how to interpret it:
-
Less than 1 cm: generally acceptable for most gym use
-
1 to 2 cm: borderline; likely to worsen under load
-
More than 2 cm: functional failure at depth
Even if migration is small, visible rolling or folding counts as a failure. A brace that changes shape is not providing consistent support.
Step 4: Transition to Load
If your brace passes bodyweight testing, the next question is whether it holds up under real stress. Parallel without load is not the same as parallel with weight compressing the knee joint.
Choose one movement you actually train with, such as squats or split squats. Progress gradually:
-
Start with a light load for 8 reps.
-
Then move to a moderate load for 6 reps.
-
Finally, test a working-level set at roughly 60–75% effort for 3-5 reps.
After each set, check the brace's position against your baseline.
If migration increases with each set, or if the brace begins to shift noticeably once load is added, that indicates the brace cannot maintain its position under real mechanical demand.
What Counts as Failure Under Load
Failure is not just about numbers. It is also about consistency and sensation.
A brace fails if:
-
Migration reaches or exceeds 2 cm
-
Movement increases significantly once weight is added
-
You have to stop mid-set to readjust
-
Hinges drift away from the joint line
-
You experience numbness, sharp pressure, or skin irritation
If you need to overtighten the brace to keep it in place and that causes tingling or discomfort, that is also a functional failure. Stability should not come at the cost of circulation or pain.
How Do Different Knee Brace Types Behave at Parallel?
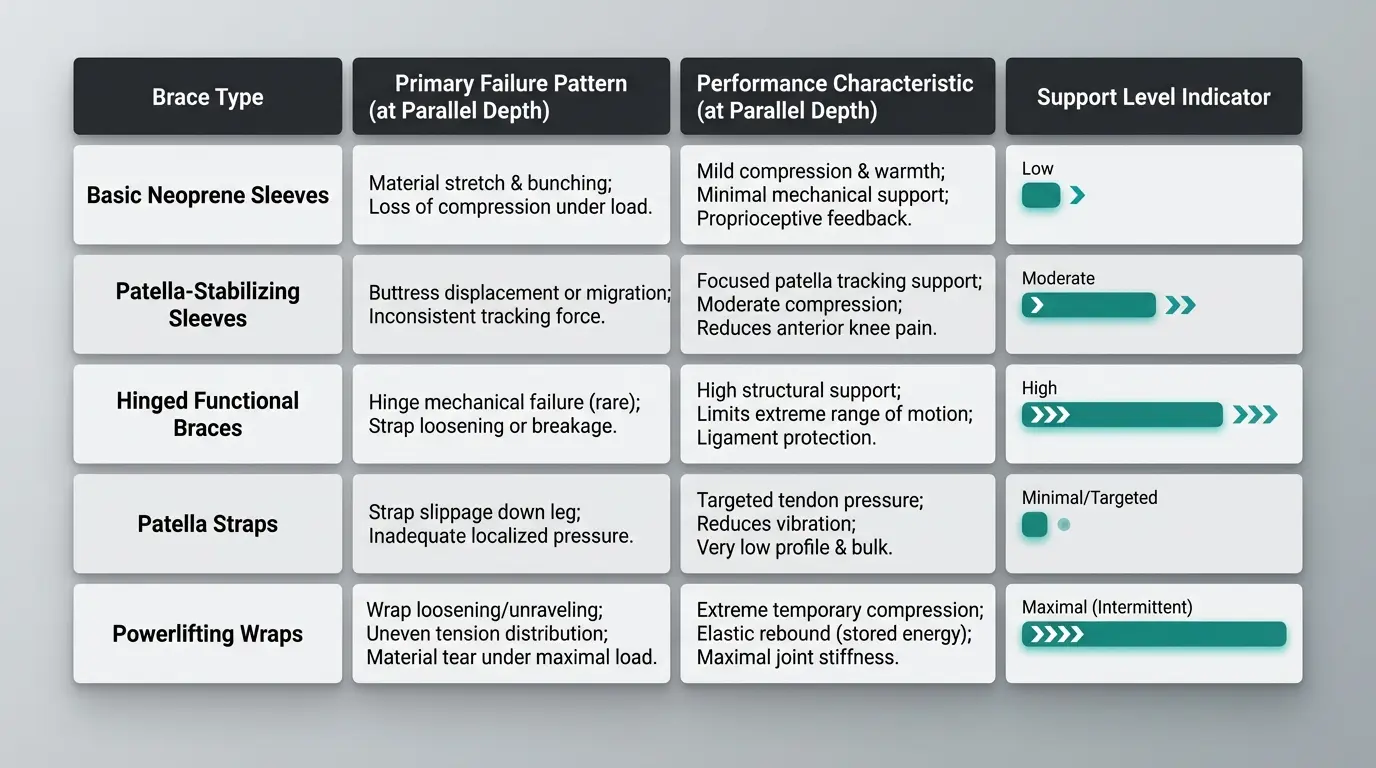
Once you understand that parallel depth changes knee biomechanics, the next step is to examine how different brace categories respond to that stress. Not all braces fail the same way. Each design has a purpose, and each has predictable limitations once the knee bends past 70 to 90 degrees under load.
Below is a neutral, category-by-category breakdown to help you compare mechanisms clearly.
1. Basic Neoprene Sleeves
To start, let’s look at the most common option found in gyms.
Neoprene sleeves are built primarily for compression and warmth. They aim to provide support through proprioceptive feedback and mild mechanical assistance around the knee joint. Many athletes report subjective stability and pain relief when wearing 5 mm or 7 mm sleeves.
Research on 7 mm sleeves during front squats found small biomechanical changes and increased perceived stability, with some lifters able to lift slightly more weight. The measurable benefits are modest but real.
How They Behave At Parallel
As flexion increases toward 90 degrees, skin and soft tissue shift relative to the sleeve. A study measuring brace-to-skin boundary movement documented migration exceeding 2 cm during flexion cycles. That shift becomes more noticeable under load.
When sleeves begin to fail at depth, you typically see:
-
Rolling at the top of the calf
-
Bunching behind the knee
-
Progressive slippage during sets
-
Skin irritation as friction increases
Because sleeves rely heavily on surface friction for support, sweat buildup increases the risk of migration and discomfort.
2. Patella-Stabilizing Sleeves
Now consider sleeves that include a patella window or buttress.
These braces focus on kneecap tracking. They are often used for runner's knee or jumper's knee, where abnormal patellar motion may increase strain on the knee. The goal is targeted support around the kneecap during movement.
How Do They Behave At Parallel
At shallow angles, alignment is usually maintained. However, once deep flexion occurs, even a small vertical migration can misalign the patella window. When the buttress shifts, it no longer supports the kneecap correctly.
At parallel depth, failure patterns commonly include:
-
Pressure on the surrounding tissue instead of the patella
-
Localized discomfort at the bottom of the squat
-
Uneven compression around the joint
Additionally, rotation of the sleeve during repeated reps can lead to irritation rather than pain relief.
3. Hinged Functional Braces
Next, we move to more structured designs.
Hinged braces aim to control excessive motion, particularly after ligament injury such as ACL tears. They attempt to limit varus, valgus, or rotational strain and are sometimes prescribed after surgery. Proper hinge alignment is critical to effectiveness.
Biomechanical research shows that hinge alignment and strap anchoring influence migration and control. When aligned correctly, they may reduce certain instability patterns.
How They Behave At Parallel
The human knee does not rotate around a single fixed axis. Its center of rotation shifts during flexion. If the hinge does not match this natural motion pattern, binding or drift can occur.
Research measuring brace movement during flexion shows that misalignment increases strain at the interface.
When hinged braces struggle at depth, the issues often include:
-
Hinge drifts away from the joint line
-
Increased shear forces
-
Bulk is interfering with deep flexion
-
Pressure-related complications
Efficacy depends heavily on fit and alignment. Without proper adjustment, risk may increase instead of decrease.
4. Patella Straps
Moving to a simpler category, patella straps function differently from full sleeves.
Patella straps apply localized pressure just below the kneecap to offload tendon strain. They are commonly used for jumper's knee and other tendon-related concerns.
They provide focused support but do not stabilize the entire knee joint.
How Do They Behave At Parallel
As the knee bends deeply, tendon compression increases. The strap can concentrate pressure in a smaller area.
Common patterns seen at depth include:
-
Increased discomfort at the bottom position
-
Sharp pressure during full flexion
-
Limited ability to achieve depth comfortably
Straps are minimal by design. They do not address global instability or migration issues.
5. Powerlifting Wraps
Finally, consider the most rigid option
Powerlifting wraps are tightly wound elastic bands designed to maximize stiffness and provide elastic recoil. They can increase the lifted load through stored elastic energy.
Their role is performance-focused rather than comfort-based support.
How Do They Behave At Parallel
Wraps typically do not migrate because they are applied under significant tension. However, this tension alters normal biomechanics.
At depth, the common concerns include:
-
Tourniquet-like pressure
-
Reduced blood flow between sets
-
Need for removal after each attempt
-
Increased difficulty with natural joint motion
The risk here is not slippage but excessive compression and potential vascular complications if worn improperly.
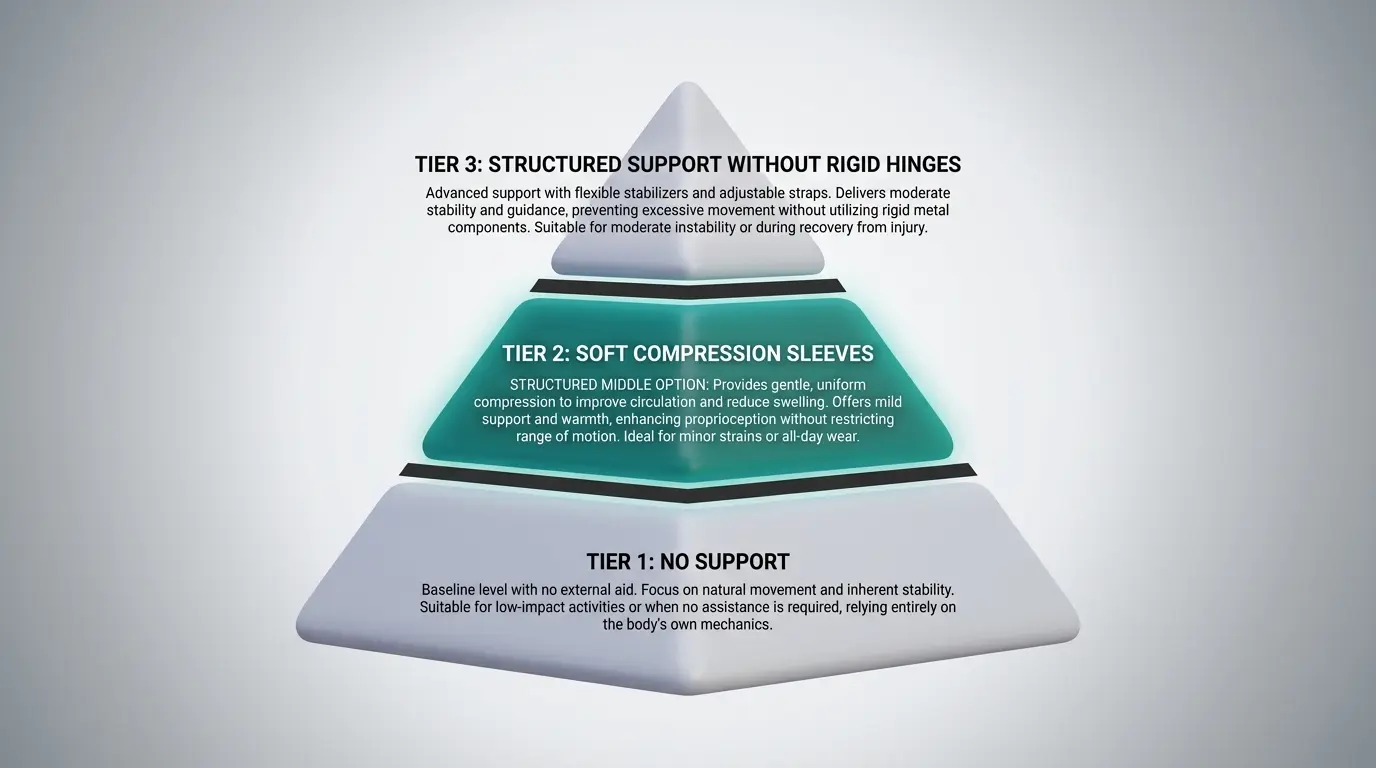
Not All Support Is Designed for Deep Flexion
By now, you’ve seen why many braces fail at parallel. The next step is understanding what actually holds when your knee bends past 70 to 90 degrees under load.
Support exists on a spectrum. Most people think in extremes, but there is a missing middle.
Tier 1: No Support
This relies entirely on your own joint control and muscle strength. For mild irritation, this may be enough. But if your knee feels unstable at depth or you train in high-load, high-rotation sports, zero external support can feel unpredictable.
Tier 2: Soft Compression Sleeves
These provide warmth and light compression. They can improve awareness and mild pain relief. However, as we discussed earlier, sleeves depend heavily on friction. At the same time, migration often increases, especially once sweat builds, and your thigh muscles expand under load.
For many lifters and grapplers, this is where problems start. The sleeve feels supportive while walking, but loses consistency exactly at the bottom of the movement.
Tier 3: Structured Support Without Rigid Hinges
This is where the missing middle lives.
Instead of rigid metal hinges that attempt to restrict motion, structured braces are designed to stabilize directionally while allowing a natural range of motion. The goal is not to lock the knee joint. The goal is to control instability without compromising deep flexion.
This is where the Anaconda Knee Brace enters the conversation for the first time.
Unlike bulky hinged braces, it wraps under, around, and above the knee, providing multi-directional anchoring. That wrap pattern distributes tension across the thigh and upper calf rather than relying solely on friction.
Here’s how the design addresses the failure patterns we covered:
-
Wrap architecture: By securing under, around, and above the knee, it reduces downward migration during deep flexion.
-
Optional side stabilizer: Adds lateral control without rigid hinge restriction.
-
Gel padding: Absorbs impact for grappling, takedowns, and floor contact.
-
Rubber inseam grip: Anchors against the thigh to prevent roll-down.
-
Fight Tech straps: Allow tension to be adjusted and locked in place rather than depending on elastic compression alone.
Biomechanically, this design attempts to solve two main issues at parallel: migration and directional instability.
It is not built for casual walking. It was designed for grappling, CrossFit, and heavy lifting, where deep flexion is constant. Today, it is used by over 300,000 athletes, holds a 4.9 rating, and has 3,448 reviews from lifters and grapplers who train at depth regularly.
This tier fills the gap between soft sleeves and rigid hinged braces. It provides structured support without restricting natural motion.
Fix Your Current Brace Before Buying Anything
Before upgrading to anything new, confirm that your current brace truly cannot perform at parallel. Many failures come from sizing, placement, or tension errors rather than design flaws. Work through these steps first.
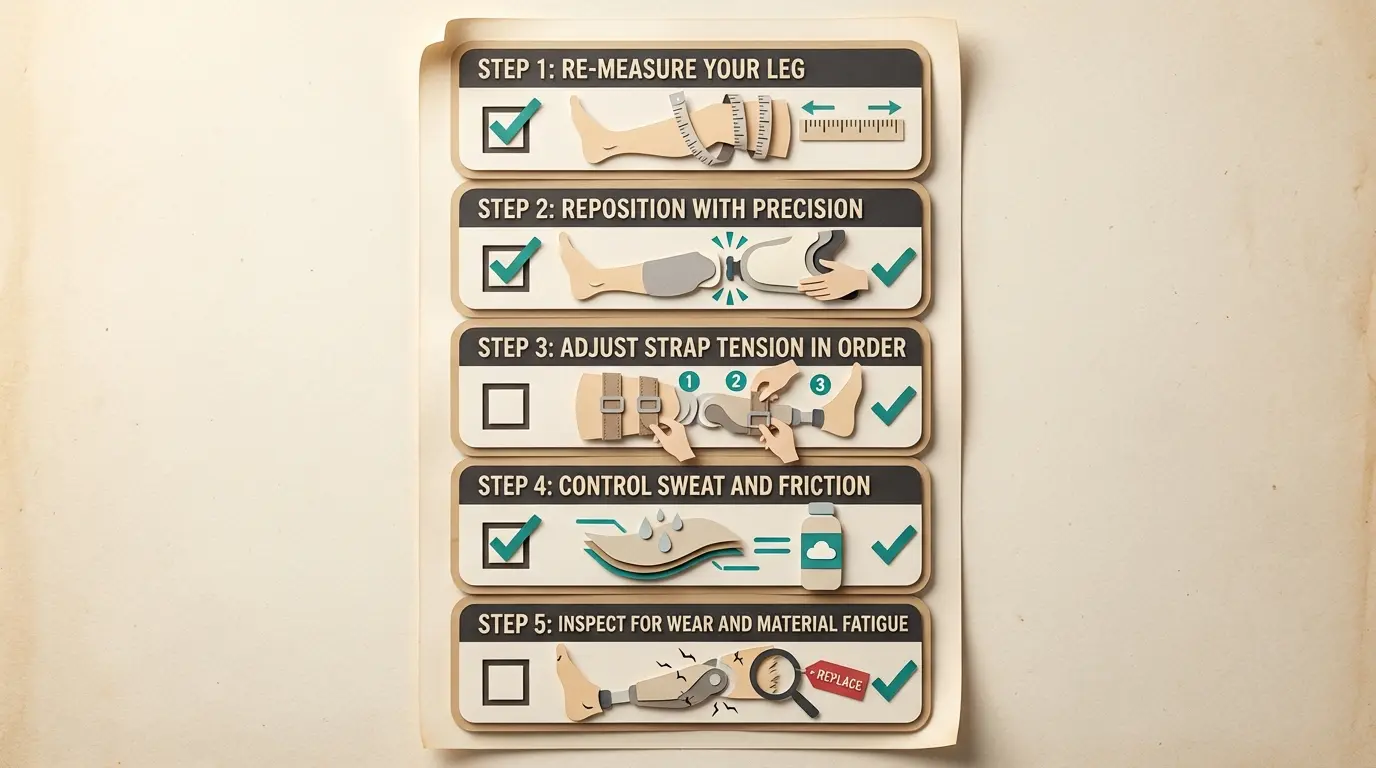
Step 1: Re-Measure Your Leg
Do not rely on the size you bought last year.
-
Measure at the center of your kneecap
-
Measure 10 cm above the kneecap
-
Measure 10 cm below the kneecap
-
Compare those numbers to the brand’s current sizing chart
Leg size changes with training. Sizing charts also get updated. Even small differences can affect stability at depth.
Step 2: Reposition With Precision
Placement matters more than most people think.
-
Center the brace directly over the kneecap
-
Make sure there is equal material above and below the joint
-
For hinged models, align the hinge with the joint line
Even 1 to 2 cm of vertical misplacement can reduce effectiveness at parallel.
Step 3: Adjust Strap Tension in Order
If your brace has straps, sequence matters.
-
Tighten the lower strap first
-
Tighten the upper strap second
-
Secure any middle strap last
After adjusting, perform 10 controlled squats to a parallel position. Check for migration, discomfort, or numbness. If you must overtighten to prevent slipping, the issue may be structural rather than a tension-related one.
Step 4: Control Sweat and Friction
Friction is part of stability.
-
Dry your skin before putting the brace on
-
Avoid lotion before training
-
Wipe the inside of the brace if it is damp
Excess moisture is one of the most common reasons braces fail mid-session.
Step 5: Inspect for Wear and Material Fatigue
Braces degrade over time.
Check for:
-
Stretched elastic that does not return to shape
-
Cracked or peeling grip bands
-
Flattened neoprene
-
Separating seams
If the material no longer rebounds or holds tension, it cannot provide consistent support.
When You Actually Need a Different Brace
If you’ve done the stress test, adjusted placement, managed sweat, and your brace still slides at parallel, it’s not a mindset issue. It’s not toughness. It’s design.
This is where smart buying matters.
You don’t need “more aggressive.” You need something better suited for deep flexion.
Let’s break down what actually makes a difference.
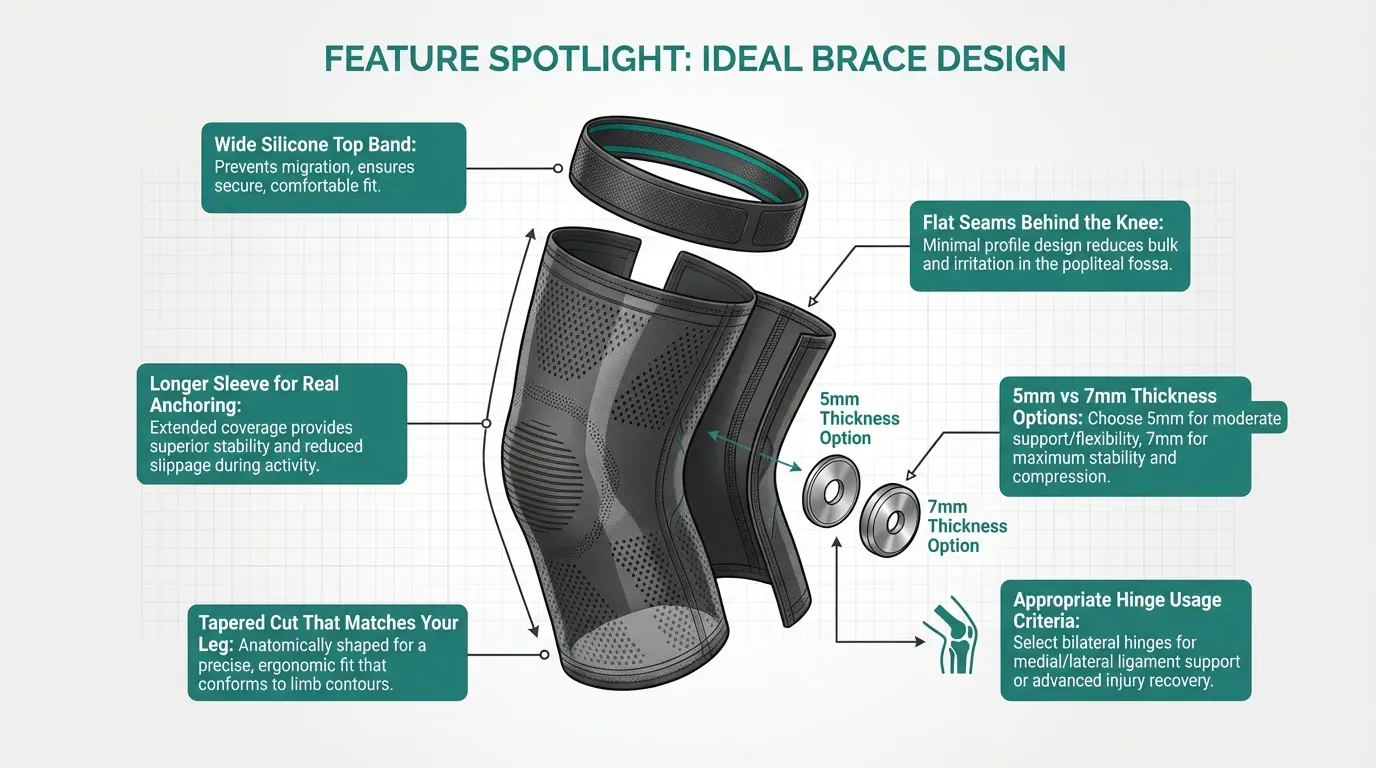
1. A Tapered Cut That Matches Your Leg
Your thigh is wider than your calf. That natural cone shape is why many sleeves drift downward under load.
A proper tapered cut hugs the thigh while narrowing toward the calf. This reduces migration when your muscles expand at 90° and helps maintain alignment through the full range.
If a sleeve is straight like a tube, slippage is predictable.
2. A Longer Sleeve for Real Anchoring
Short sleeves rely on minimal surface contact. At the same time, that limited grip often isn’t enough.
A longer sleeve extends higher on the thigh and lower on the calf. That added contact area distributes compression more evenly and reduces roll-down.
More surface area equals more stability during deep flexion.
3. A Wide Silicone Top Band
A thin grip strip works in theory. In a sweaty training session, it often fails.
A wide silicone top band improves friction and anchoring. It helps the brace stay in place, even when heat and sweat build up.
This is especially important for CrossFit, grappling, and high-volume squat days.
4. Breathable Knit Over Heavy Neoprene
Heat is the silent enemy of stability.
When a brace traps heat, sweat increases. When sweat increases, friction decreases. When friction decreases, migration increases.
Breathable knit materials reduce moisture buildup and improve long-session performance. If your brace feels swampy by set three, that’s a design issue.
5. Flat Seams Behind the Knee
Deep flexion means the back of your knee compresses. Thick seams bunch. Bunching creates pressure points. Pressure leads to irritation.
Flat seams reduce that friction so the brace can move with your knee instead of fighting it.
6. 5 mm vs 7 mm: Know What You’re Training For
Thickness changes feel.
-
5 mm: More flexible, better for daily training, rehab blocks, and mobility work.
-
7 mm: Firmer compression, more perceived stability under heavier loads.
Neither is “better.” It depends on how often you train at 80% plus and how much structure you personally need at depth.
7. When Hinged Braces Are Actually Appropriate
Hinged braces are not evil. They are simply specific.
They are appropriate when instability has been confirmed through evaluation, such as during post-ACL rehabilitation or in cases of ligament laxity. They are not meant to address general deep-squat discomfort.
If you do not have confirmed instability, a rigid hinge often adds bulk without improving real-world performance at parallel.
Beyond the Brace: Build a Knee That Holds at Parallel
A brace can support you. It cannot replace strength.
If your goal is long term stability at parallel, the real solution lies in muscle capacity, movement control, and smart progression. This is where durability is built.
Quad Strength
The quadriceps control knee extension and absorb load at the bottom of a squat. If you struggle at 70 to 90 degrees, it often reflects limited strength in that exact range.
Focus on controlled movements such as:
-
Tempo squats with a 3 to 4 second descent
-
Step downs from a box
-
Split squats through a comfortable but progressive range
Build strength where you feel unstable, not just above it.
Glute Strength
Your glutes stabilize the hip. The hip controls the knee. If the glutes are weak, the knee collapses inward at depth.
Prioritize:
-
Single-leg RDLs
-
Lateral band walks
-
Rear foot elevated split squats
Improved hip control reduces unnecessary strain at the knee joint.
Ankle Mobility
Limited ankle dorsiflexion forces compensations. If your ankle cannot move forward, your knee or hip will try to compensate.
Add:
-
Ankle mobility drills
-
Calf stretching
-
Controlled knee over toe work within tolerance
Better ankle range allows smoother mechanics at parallel.
Load Management
Pain at depth often comes from volume spikes rather than weakness alone.
Reduce total volume temporarily. Lower load by 10 to 20 percent. Allow tissue to adapt. Progress gradually rather than jumping from low to high intensity in one week.
Consistency beats aggressive jumps.
Parallel Depth Control
Control builds confidence.
Pause at parallel for one to two seconds. Slow the descent. Own the bottom position instead of bouncing out of it.
Tempo work improves proprioception and reinforces alignment. When you can control parallel without rushing, stability improves naturally.
The long-term goal is simple. Build a knee that does not rely on external support to function at depth.
Safety, Discomfort, and When to Stop Relying on a Failing Brace
Support devices are tools, not fixes. If warning signs appear, stop and reassess.
Numbness or Tingling
If your foot goes numb within seconds of tightening a brace, that is not normal. Loosen it immediately. Compression should never compromise circulation.
Skin Breakdown
Persistent redness, blisters, or open irritation mean excessive pressure or friction. Continued use can worsen tissue damage.
Over-Tightening Risks
More tension does not equal more stability. Over-tightening increases pressure and may reduce blood flow without correcting migration. If you must crank it down aggressively to feel secure, the brace may not be the right design for you.
PAOD Contraindication
Individuals with peripheral arterial occlusive disease should avoid high compression devices unless cleared by a medical professional. Restricted blood flow can create serious complications.
When to Seek Evaluation
Stop self-adjusting and seek professional evaluation if you experience:
-
Sudden large swelling
-
Audible pop during injury
-
Locking or catching sensations
-
True giving way episodes
-
Pain that persists for weeks despite reduced load
Authority comes from knowing when support helps and when medical evaluation is necessary.
Conclusion
If your knee brace fails at parallel, it is not random. Deep flexion exposes design limits in fit, friction, and structure. Once you understand why migration happens and how to test it, you stop guessing and start making informed decisions.
The real goal is simple. Build strength, control your depth, and use support as a tool, not a crutch.
If you train in deep flexion sports and your current sleeve keeps sliding, a structured option built for that range may make a difference. The Anaconda Knee Brace was designed specifically for grappling, CrossFit, and heavy lifting, with anti slip grip and optional stabilizer support to reduce migration without restricting motion.
Use the framework in this article, test your current setup, and choose support that actually holds where it matters most.
FAQs
Below are concise answers based on the biomechanics and testing framework covered in this article and supported by the referenced evidence.
Why does my knee sleeve only slip when I squat to parallel and not when I walk?
Walking keeps the knee under roughly 30 to 40 degrees of flexion, where skin movement under the device is minimal. When you squat to 70 to 100 degrees, the range of motion increases and soft tissue shifts more significantly. Research has measured over 2 cm of brace migration at deeper flexion angles. That shift can occur within seconds once the load is applied. The device's effectiveness declines at parallel because friction, pressure, and alignment are challenged under higher demand.
Should I just buy a smaller size so my knee brace does not roll down?
Sizing down may increase compression, but it does not always improve effectiveness. Excess pressure can cause numbness within seconds and create new issues without preventing slippage. The real problem often relates to leg shape, taper, and design limitations. Re-measure at the kneecap, 10 cm above, and 10 cm below, then compare to the current sizing chart. Evidence suggests proper fit contributes more to stability than simply choosing a tighter device.
Can knee sleeves actually change how I squat?
Yes, research on 7 mm sleeves has shown small but measurable changes in knee mechanics during squats. These changes may increase perceived stability and short-term performance. However, the overall effect is limited and depends on fit and stiffness. Sleeves can subtly influence joint loading and movement patterns. Periodically perform lighter sets without the device to analyze whether your mechanics remain consistent.
How often should I replace my knee sleeves if I train regularly?
Most neoprene sleeves lose meaningful compression within 12 to 24 months if used two to three times per week. Over time, elastic fatigue reduces effectiveness and increases slippage. Inspect for stretched fabric, cracked grip bands, or flattened material. If migration increases during your parallel stress test, performance decline has likely begun. Replace the device based on function, not age alone.
Do I really need a brace if my knees only hurt at the bottom of a squat?
Not necessarily, as bottom range discomfort often relates to load spikes or strength imbalances. Reducing volume and adjusting tempo may resolve symptoms. Rehabilitation work for quads, glutes, and ankle mobility can contribute to long-term prevention. Support devices offer short-term assistance but have a limited impact on root causes. If pain persists or instability is detected, seek professional evaluation before escalating to a more rigid brace.


