


Most athletes guess at brace tightness. They cinch it down until it feels secure or leave it loose enough that they forget it is there. Both habits create problems that show up mid-roll, mid-rep, or mid-run. By then, it’s too late to adjust without stopping entirely.
A shoulder brace that is too tight restricts your range of motion and cuts circulation. Too loose, and the compression level needed to stabilize the joint simply is not there. Neither extreme does anything useful for your training or your recovery.
At Anaconda, we created our shoulder brace range for athletes who cannot afford to guess. Whether you are training through a rotator cuff issue, returning from injury, or looking for reliable joint support between heavy sessions, this guide breaks down exactly how your brace should fit and what it means when it doesn’t.
Key Takeaways
-
The 2-finger rule is the fastest way to check that your brace is sitting at the right compression level, not too tight and not too loose.
-
Numbness or tingling in the arm, hand, or fingers is a non-negotiable stop sign. Loosen the brace immediately.
-
Compression needs vary by activity. The right tightness for a heavy overhead press is different from what a live grappling round demands.
-
Over-tightening a shoulder brace can compress the ulnar nerve at the elbow, a risk almost never mentioned in standard brace guides.
-
Shoulder braces are not adjusted the same way across types. Sleeves, stabilizers, and immobilizers each follow different rules.
-
Always start loose and tighten incrementally. Strapping in at maximum compression and working backward is one of the most common mistakes athletes make.
The Ideal Shoulder Brace Fit: Snug, Not Strangling
The standard is straightforward: Your brace should feel supportive and provide support with a proper fit, not feel tight or uncomfortable. It should fit snugly so the joint feels stable through basic movement without pinching, but never so tight that it restricts blood flow, causes tingling or numbness, or kills your mobility before the session even starts.
That line is easier to find than most athletes expect, and checking that the brace fits properly is part of a repeatable process for getting there.
The 2-Finger Rule and the 3-Step Fit Check
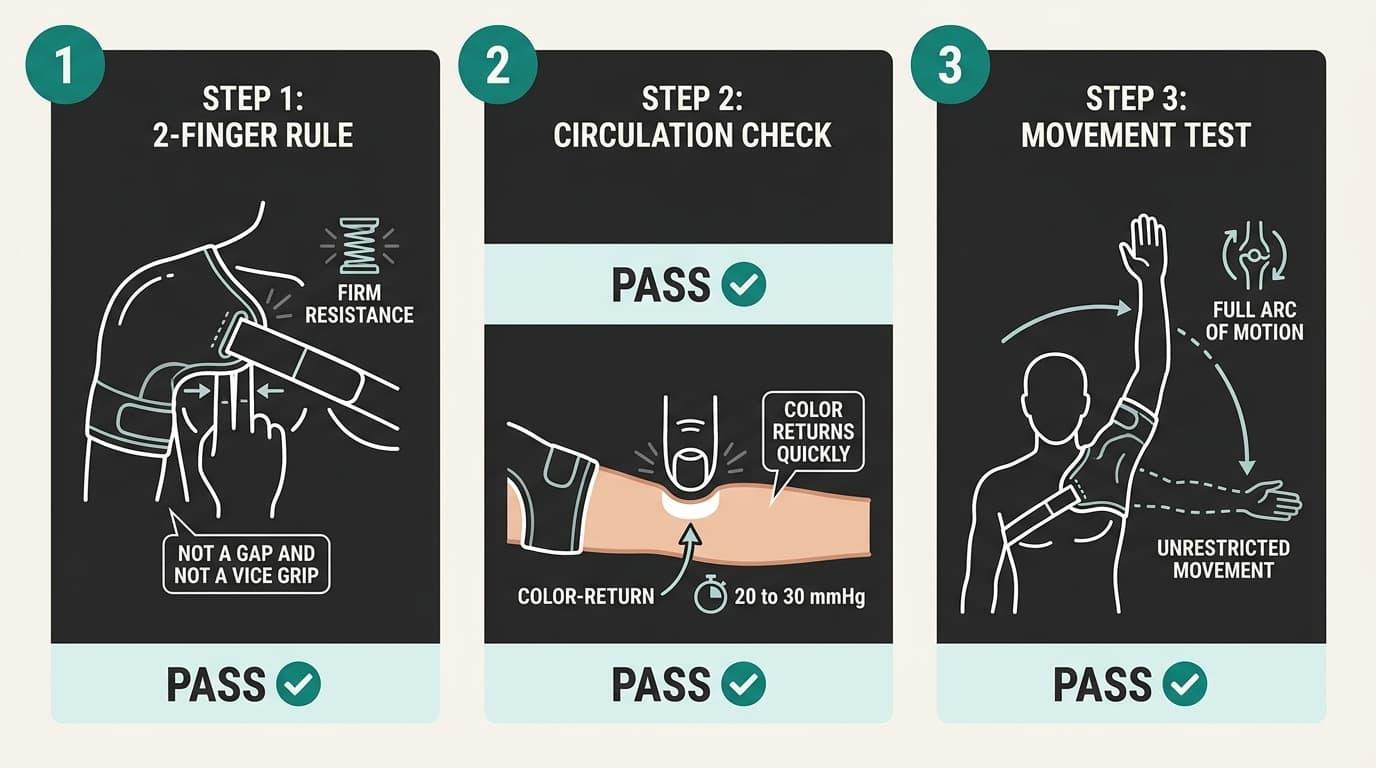
The 2-finger rule is your baseline. After securing the brace, slide two fingers under any strap or compression panel. They should slide under the strap comfortably with light resistance. If you cannot get them under at all, loosen it. If your fingers swim through with no resistance, tighten up.
Set your arm with the elbow bent at about 90 degrees before checking fit. Run this three-step check every time you strap in, not just the first time you put it on:
-
2-Finger Rule: Slide two fingers under every strap. You should feel firm resistance, not a gap and not a vice grip. If the strap will not allow two fingers, it is too tight.
-
Circulation Check: Press a fingernail into the skin below the brace for two seconds, then release. Color should return promptly. A slow return, pale skin, or a bluish tint means blood flow is being compromised. Loosen immediately.
-
Movement Test: Raise your arm overhead and rotate the shoulder through a full arc. The brace should move with you and allow basic movement without pinching. If it bites, pulls, or creates pressure points at any point, your range of motion is being restricted.
If any step fails, adjust before you train. Not after.
For compression sleeves specifically, the therapeutic target sits around 20 to 30 mmHg. This is the medical-grade compression range used for arm sleeves in clinical and athletic settings. Going above that range without clinical guidance adds risk, not support.
Signs Your Shoulder Brace Is Too Tight or Too Loose
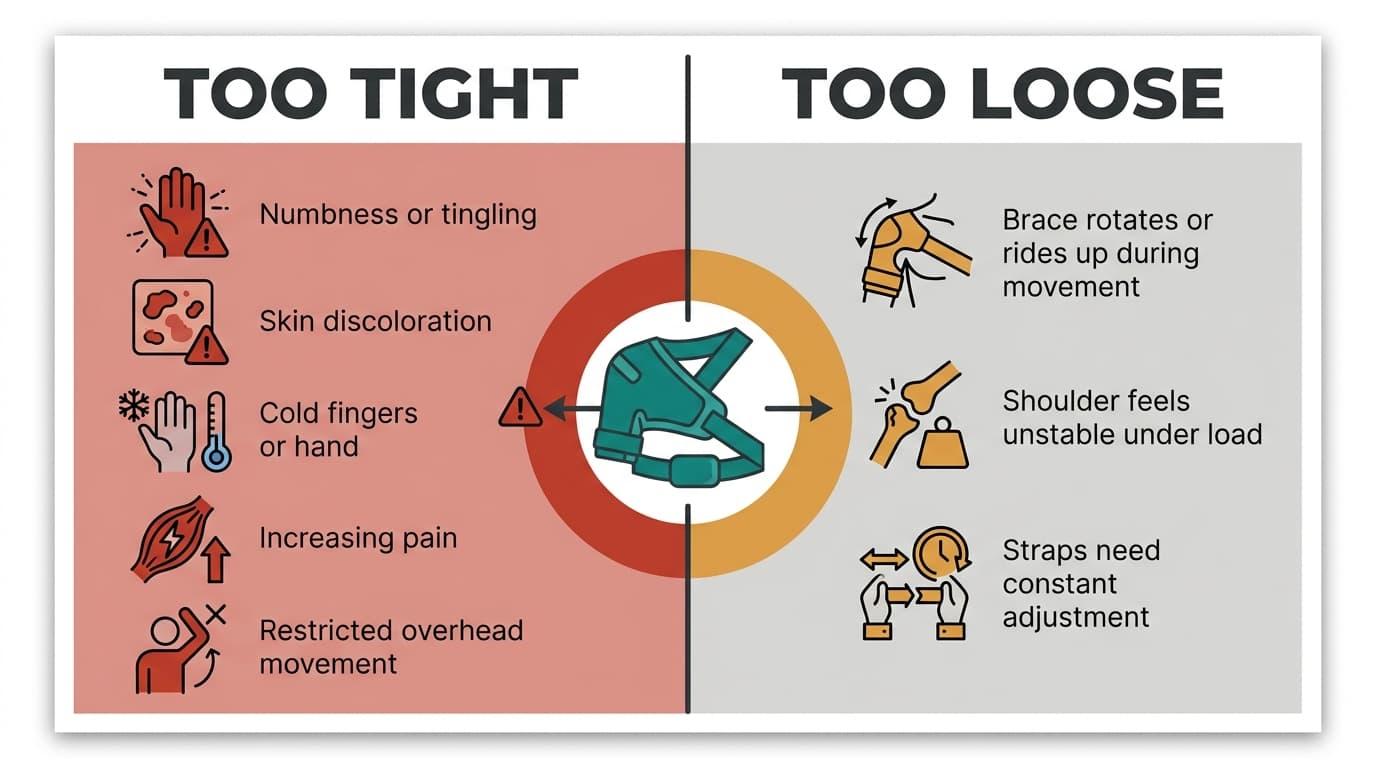
Most athletes only notice a bad fit when something goes wrong mid-session. Learning to read the warning signs before you hit the mat is the smarter play, and it starts with knowing what a bad fit looks like in both directions.
When the Brace Is Too Tight
A brace cranked down too hard doesn’t just feel uncomfortable; it actively works against you. A too-tight fit can also cause nerve irritation and stiffness, not just shoulder discomfort. Watch for these signs:
-
Numbness or tingling in the arm, hand, or fingers. These are the most urgent warning signs. Stop activity immediately if either appears.
-
Skin discoloration: red streaking or a purple tint under the brace edge signals compromised circulation.
-
Cold fingers or hand: a temperature drop below the brace means blood flow is being restricted.
-
Pain that increases after strapping in, rather than settling, since a poor fit can worsen a painful shoulder and create new issues.
-
Restricted overhead movement: if your arm will not clear your ear, the compression panel is locking the joint instead of supporting it.
Numbness and tingling are non-negotiable stop signs. They mean the brace is cutting off the nerve or vascular supply. Loosen it before you do anything else.
When the Brace Is Too Loose
A loose brace is a false sense of security. It feels like support until the moment you actually need it, and then it fails. The most common complaint from grapplers and lifters is slippage during live movement. If the brace shifts during movement, readjust it immediately rather than training through it. The brace rotates, rides up, or bunches under clothing the second intensity picks up.
Other signs your fit is off in the other direction include the shoulder stabilizer failing to hold the joint during lateral or overhead load, and adjustable straps that need constant repositioning between rounds, which usually means a properly fitted brace is not staying in the correct position.
Fit Diagnostic Reference
The table below summarizes the most common fit issues, the symptoms they produce, and what they signal about your compression level:
|
Fit Issue |
Symptoms |
What It Signals |
|
Too Tight |
Numbness, tingling, skin discoloration, cold fingers, pain increase |
Restricted blood flow or nerve compression. Loosen immediately. |
|
Too Tight |
Limited overhead range, brace biting into tissue |
Joint mobility is being blocked, not supported |
|
Too Loose |
Brace rotates or rides up during movement |
Insufficient contact for proprioceptive feedback |
|
Too Loose |
Shoulder feels unstable under load, straps need constant adjustment |
Compression is too low to engage the joint effectively |
If your brace is doing either, the fix isn’t toughing it out. Adjust the fit before the next session.
Not All Shoulder Braces Fit the Same Way
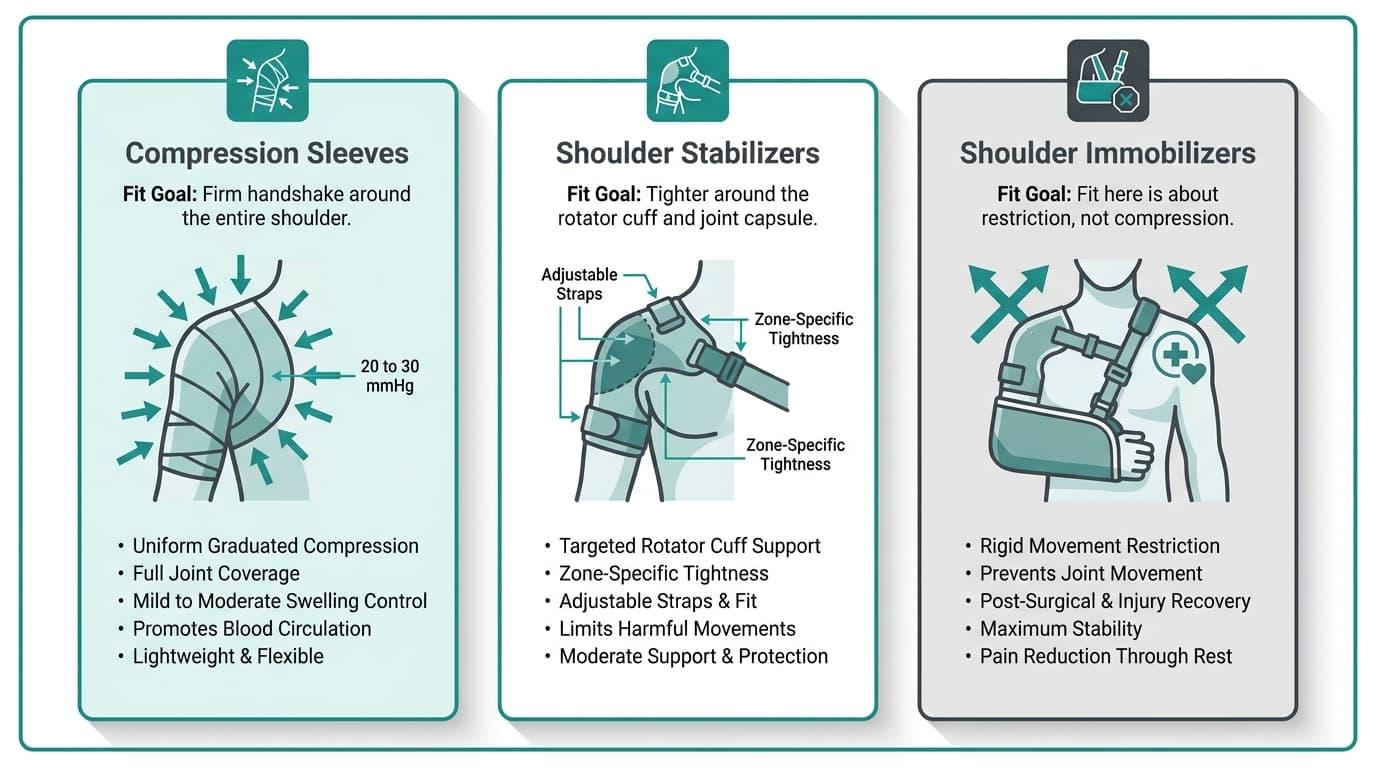
Tightness means something different depending on the type of brace you’re wearing, because many shoulder braces fall into immobilizing, compression, or stabilizing categories, and each has a different fit goal.
Applying the same fit logic to every shoulder brace is one of the most common mistakes athletes make, and it’s one that’s easy to avoid once you understand what each type is actually designed to do.
Compression Sleeves vs. Shoulder Stabilizers vs. Shoulder Immobilizers
The three main brace types have completely different jobs, and they’re adjusted differently as a result. Here’s how to approach the fit on each: compression braces, stabilizing braces, and immobilizing braces.
-
Compression sleeves: These should feel like a firm handshake around the entire shoulder. Consistent pressure, no pinch points, no gaps. The therapeutic target sits around 20 to 30 mmHg. As compression braces, they apply steady pressure to help reduce swelling and provide pain relief. Too far above that without clinical guidance, and you’re only increasing risk.
-
Shoulder stabilizers: These are built for zone-specific control. Tighter around the rotator cuff and joint capsule, slightly looser at the upper arm. Adjustable straps let you dial in pressure where the joint actually needs it, while still allowing controlled shoulder movement. This is where fit becomes a skill, not just a feeling.
-
Shoulder immobilizers: Fit here is about restriction, not compression. The goal is limiting movement, not managing blood pressure. These are for severe injuries or post-surgical recovery, where limiting shoulder movement matters more than mobility.
Abduction braces are another post-injury option, designed to align the upper arm bone with the shoulder blade.
Pull-on sleeves give you uniform compression with limited ability to adjust. Dual-strap and wrap-style braces let you target specific zones, which is exactly what high-intensity training demands.
If you’re training through a rotator cuff issue and need a shoulder brace that lets you calibrate tightness by zone, the Anaconda Shoulder Brace is built specifically for this. Adjustable straps let you lock in joint support without sacrificing the range of motion your training requires. At $49.95, it’s an accessible step between full rest and full training.
Tightness by Activity: Lifting, Grappling, and Daily Wear
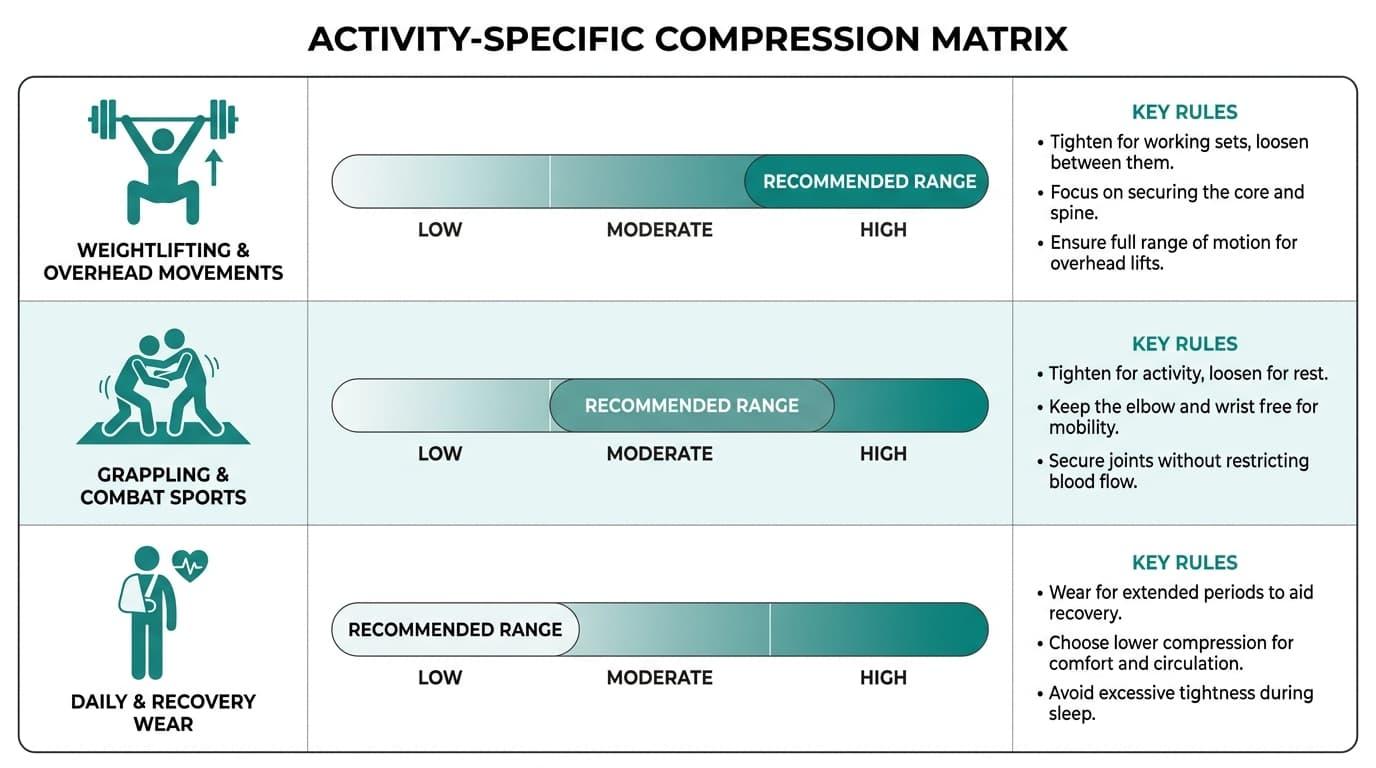
Compression level isn’t a fixed setting. The right tightness for a heavy overhead press is not the right tightness for a recovery walk, and it’s definitely not the right tightness for a live grappling round. Calibrating your brace by activity is what separates smart training from guesswork.
Weightlifting and Overhead Movements
Lifting creates a predictable, directional load on the shoulder joint. That predictability works in your favor when fitting a brace. Here’s how to adjust for it:
-
During heavy sets: Tighten the brace to increase medial support and reduce joint translation under load. The joint needs to feel locked in, not floating.
-
During warm-up: Back off the compression slightly. A restricted range of motion during warm-up sets limits the motor patterns you are trying to groove.
-
During pressing movements: Avoid over-compressing the deltoid. Excess pressure during a press creates a pinch point that disrupts the movement arc and reduces force output.
-
General rule: Tighten for working sets, loosen between them.
Grappling and Combat Sports
Grappling puts rotational, unpredictable force through the shoulder in every direction. A brace that fits fine on a bench can fail completely in a clinch. In combat sports, that failure has real consequences. Here’s how to account for it:
-
Tighten enough to resist rotation: The brace must hold its position when your opponent grabs, pulls, or drives through your shoulder. Slippage mid-scramble is a safety risk, not just an inconvenience.
-
Keep the elbow and wrist free: Compression at the shoulder should not travel down the arm. Restricted elbow or wrist movement kills your ability to post, frame, and grip effectively.
-
Check fit before live rounds: Not before warm-up. Before the intensity actually starts.
-
Proprioception matters here: A correctly fitted shoulder stabilizer sharpens joint awareness during dynamic movement. An over-tight brace numbs that sensory feedback and reduces your athletic confidence when you need it most.
Daily and Recovery Wear
Long wear at high tightness is counterproductive. Shoulder braces provide short-term stability and pain reduction during recovery wear, not constant compression. Blood flow needs to move freely during rest and recovery, and sustained compression at training levels fatigues the tissue rather than supporting it. Keep these principles in mind:
-
Use lighter compression for daily wear: Enough to feel the joint, not enough to restrict it. If you're new to managing shoulder pain, gradually increase wear-time instead of jumping straight to all-day use.
-
Avoid wearing the same setting around the clock: Tighten for activity, loosen for rest. That contrast is intentional.
-
High tightness over long periods impairs proprioception: The sensory feedback loop that makes a brace useful depends on appropriate pressure, not maximum pressure.
As a general principle across all three contexts, the brace should serve the activity, not the other way around. Dialing in the right compression for your situation is a habit worth building early, and most braces should also be cleaned as directed to help prevent skin irritation. If the material feels rough, wearing a light, breathable layer underneath can improve comfort.
Why Over-Tightening Can Damage More Than Just Comfort
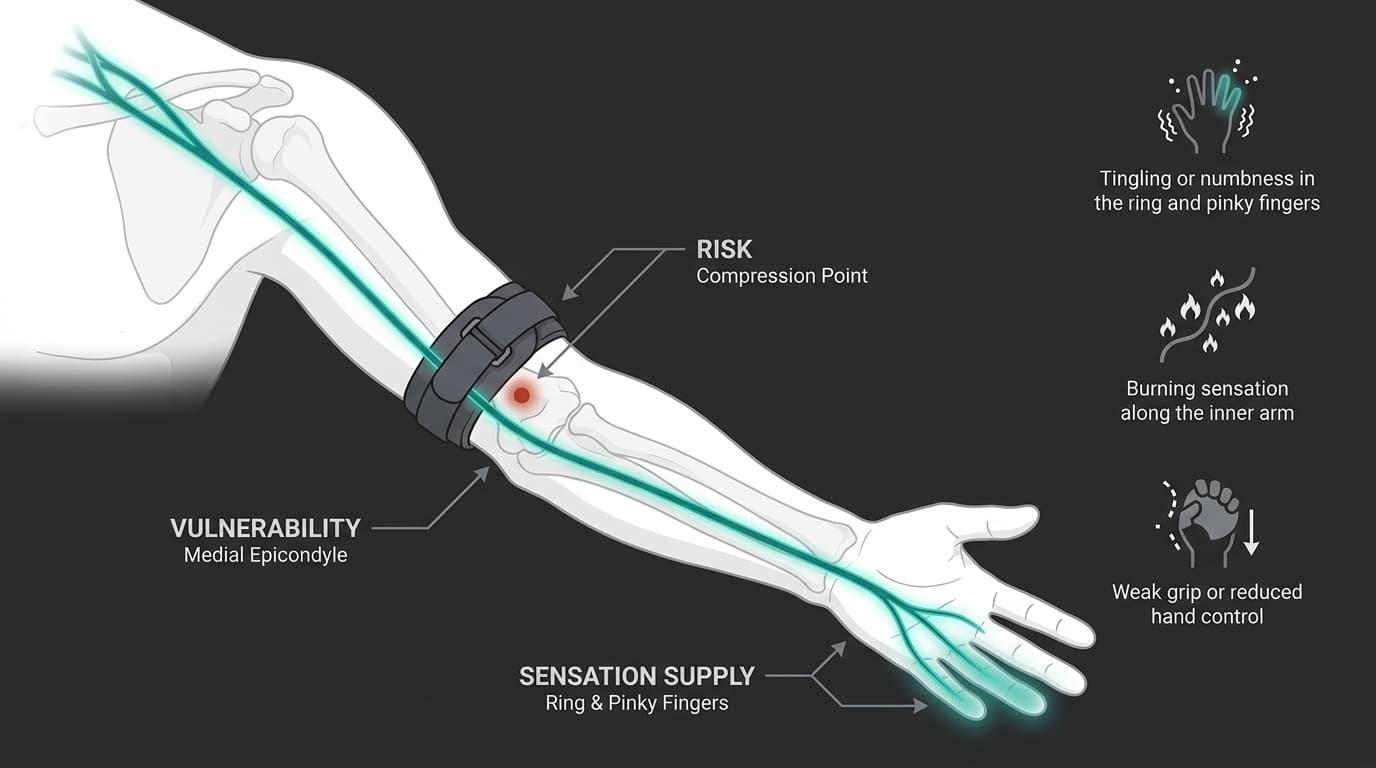
Most athletes assume over-tightening just means discomfort. It doesn’t.
Crank your shoulder brace down too hard, and you’re not just limiting the range of motion.
You’re putting real pressure on structures that don’t respond well to sustained compression.
One of those structures rarely comes up in brace-fitting conversations, and it should.
Ulnar Nerve Compression: The Risk No One Talks About
The ulnar nerve runs along the medial side of the arm, passes behind the medial epicondyle at the elbow, and continues into the forearm and hand, supplying sensation to the ring and pinky fingers.
The elbow is where it sits closest to the surface and is most vulnerable to external pressure. When a brace or strap compresses the inner arm, particularly around the elbow area, that nerve pathway can be directly affected.
Symptoms of ulnar nerve compression include the following:
-
Tingling or numbness in the ring and pinky fingers
-
A burning sensation along the inner arm
-
Weak grip or reduced hand control
-
A persistent dead-arm feeling that does not clear between rounds
Training through those symptoms isn’t toughness, it’s nerve damage in progress.
Numbness that doesn’t clear after loosening the brace is a signal to remove it entirely and consult a medical professional. Do not retighten and push through. Sustained compression on that nerve pathway risks more than just a bad session.
The 2-finger rule from the earlier fit check is your primary defense here.
If two fingers will not slide under the adjustable straps with light resistance, the brace is already in dangerous territory for blood flow and nerve health.
Fit it right before you train, not after the tingling starts.
How to Adjust Your Shoulder Brace for the Right Compression
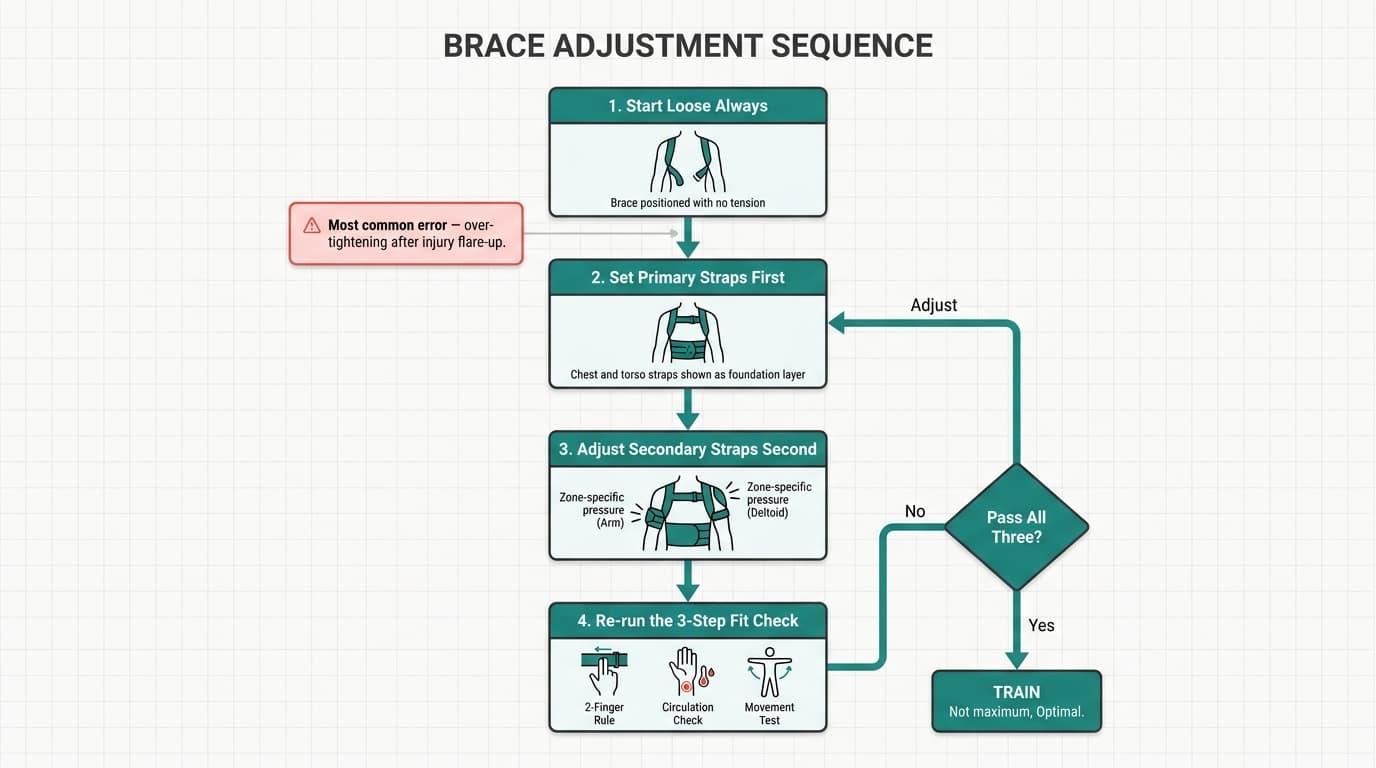
Start loose, always. The right shoulder brace should sit in line with the body’s natural contours when fastened. Never strap in at maximum tightness and work backward. Begin with a relaxed fit, then tighten incrementally until the joint feels supported without restriction. The adjustment sequence matters as much as the final setting.
Follow this sequence on every session:
-
Set primary straps first: The straps crossing your chest or torso establish the foundation. Get these right before touching anything else.
-
Adjust secondary straps second: Arm and deltoid straps fine-tune zone-specific pressure once the anchor is set over the affected shoulder.
-
Re-run the 3-step fit check after every adjustment: 2-finger rule, circulation check, movement test. In that order.
Before adjusting, check the manufacturer’s sizing guide using your bicep circumference and shoulder width so the brace fits properly.
For wrap-style and dual-strap braces, tighten the joint-side strap first. Check your range of motion immediately. Then adjust the anchoring strap to lock the position in.
The most common error: Athletes over-tighten immediately after an injury flare-up, convinced that more compression means faster healing. It doesn’t. Cranking the adjustable straps down hard after a flare compresses tissue and nerve pathways around the rotator cuff and risks the exact damage you are trying to avoid.
The compression level you’re chasing is not maximum. It is optimal. A properly fitted shoulder stabilizer should feel present for the first few minutes, then effectively disappear. If you are constantly aware of the brace mid-round, repositioning it, or feeling it bite during movement, the fit is off and needs to be dialed back before you continue. If you are unsure about fit for a specific injury, consult a physician or physical therapist.
Final Words
Snug but never circulation-restricting. That’s the standard, and it doesn’t change regardless of your sport, your injury history, or how hard the session gets. Run the 3-step check every time you strap in: 2-finger rule, circulation check, movement test, in that order. If any step fails, adjust before you train.
At Anaconda, we design for athletes who train through the hard stuff, not around it. The Anaconda Shoulder Brace gives you zone-specific adjustability, 3D knit compression, and a fit you can dial in for every session, not just the first one. Over 400,000 athletes have trained in our gear, and precision fit is why they keep coming back.
Frequently Asked Questions
Not sure if you're wearing your shoulder brace correctly or getting the most out of it? Here are quick answers to the most common questions about shoulder brace fit, wear time, and support for rotator cuff injuries.
How do I know if my shoulder brace fits correctly?
A shoulder brace should feel snug, not tight, and supportive without causing numbness, tingling, or discomfort. A good rule is that you should be able to slide two fingers under the straps while still feeling firm compression. The brace should also stay in place during movement without shifting. If it digs into the skin or restricts normal motion, it likely needs adjustment. For a proper fit, it should lie naturally against the body when fastened correctly.
Is it okay to wear a shoulder brace all day?
No, most shoulder braces are not meant to be worn at full compression all day. If you’re wearing a shoulder brace for a rotator cuff tear, wear time often runs about 4–6 weeks, depending on medical guidance. They’re generally most effective during training, sports, or activities that place stress on the shoulder. Wearing a brace continuously may become uncomfortable and reduce muscle engagement over time. Most athletes loosen or remove the brace when resting.
Should I wear my shoulder brace over or under my shirt?
A shoulder brace is usually most effective when worn directly against the skin. This provides more accurate compression and helps keep the brace from moving during activity. Wearing it over clothing can reduce support and cause shifting during exercise. For training and sports, wearing it under your shirt is generally the better option.
When should I not wear a compression sleeve?
You should avoid wearing a compression sleeve if you have open wounds, certain circulation problems, or medical conditions that affect blood flow. Compression may also be inappropriate immediately after some surgeries unless recommended by a healthcare professional. If you have concerns about circulation or skin health, consult a medical provider before use. Safety should always come before compression support.
Do shoulder braces actually help with rotator cuff issues?
Yes, shoulder braces can help support a torn rotator cuff while it heals by providing support and improving shoulder stability during movement. They may reduce strain on the injured area and improve body awareness while training or performing daily activities. That support can also help prevent further injury or damage during activity. However, a brace does not heal a rotator cuff injury on its own or guarantee proper healing. It works best when combined with rehab exercises and, when appropriate, medication under professional guidance.


